|
|
D01419820B |

32-Bit Float Field Recorder and Lavalier Mic
OWNER'S MANUAL
V2.00
|
|
D01419820B |
32-Bit Float Field Recorder and Lavalier Mic
OWNER'S MANUAL
V2.00
Thank you very much for purchasing this TASCAM product.
Before using this unit, read this Owner's Manual carefully so that you will be able to use it correctly and enjoy working with it for many years. After you have finished reading this manual, please keep it in a safe place for future reference.
 Lightweight, compact and wearable design
Includes 32-bit float recording and dual AD converter technologies, enabling high resolution to be retained when recording voices at all levels from whispering to shouting
Supports capturing metadata (WAV file BEXT and iXML) when recording
Supports high-capacity microSDXC cards (up to 512 GB)
Records at least 15 hours using two AAA batteries*
TM-10L pin (lavalier) mic included
The DR-10L Pro CONNECT remote control app can be used to control and monitor up to 5 of these recorders if they have AK-BT1 Bluetooth® adapters (sold separately) installed.** Moreover, wireless timecode synchronization with products made by Atomos is supported.
* The battery operation times could vary depending on the settings, batteries and media being used.
** The number of recorders that can be connected could vary depending on the surrounding environment and radio wave conditions.
1 - 2 Conventions used in this manual
The following conventions are used in this manual.
The area of the display that is shown in inverse (light on dark) is referred to as the cursor or as being highlighted.
The term “microSD/microSDHC/microSDXC memory card” is abbreviated as “microSD card”.
Information shown on a computer display is written like this: “OK”.
References to “iOS” in this document also include “iPad OS”.
As necessary, additional information is provided under TIP, NOTE and CAUTION headings.
TIP
These are tips about how to use the unit.
NOTE
These provide additional explanations and describe special cases.
CAUTION
Failure to follow these instructions could result in damage to equipment or lost data, for example.
 CAUTION
Failure to follow these instructions could result in injury.
1 - 3 Trademarks and copyrights
TASCAM is a registered trademark of TEAC Corporation.
microSDXC Logo is a trademark of SD-3C, LLC.
![]()
MPEG Layer-3 audio coding technology licensed from Fraunhofer IIS and Thomson.
Supply of this product does not convey a license nor imply any right to distribute MPEG Layer-3 compliant content created with this product in revenue-generating broadcast systems (terrestrial, satellite, cable and/or other distribution channels), streaming applications (via Internet, intranets and/or other networks), other content distribution systems (pay-audio or audio-on-demand applications and the like) or on physical media (compact discs, digital versatile discs, semiconductor chips, hard drives, memory cards and the like). An independent license for such use is required. For details, please visit http://mp3licensing.com.
The Bluetooth® word mark and logo are the property of Bluetooth SIG, Inc. and are used by TEAC Corporation with permission.
Microsoft and Windows are either registered trademarks or trademarks of Microsoft Corporation in the United States and/or other countries.
Apple, Mac, macOS, iOS, iPad, iPadOS and iTunes are trademarks of Apple Inc. in the United States and other countries. The iPhone trademark is used under license from Aiphone Co., Ltd.
App Store is a service mark of Apple Inc.
IOS is a trademark or registered trademark of Cisco Systems, Inc. in the U.S. and other countries and is used under license.
Android and Google are trademarks of Google LLC.
Other company names, product names and logos in this document are the trademarks or registered trademarks of their respective owners.
|
Information is given about products in this manual only for the purpose of example and does not indicate any guarantees against infringements of third-party intellectual property rights and other rights related to them. TEAC Corporation will bear no responsibility for infringements on third-party intellectual property rights or their occurrence because of the use of these products. |
|
Properties copyrighted by third parties cannot be used for any purpose other than personal enjoyment and the like without the permission of the right holders recognized by copyright law. Always use this equipment properly. TEAC Corporation will bear no responsibility for rights infringements committed by users of this product. |
1 - 4 Accessories sold separately
The following items must be used with this product to record and to monitor playback/input sound. Please purchase them separately.
A microSD card
2 AAA batteries
Monitoring equipment (headphones, earphones, etc.)
A card is necessary to record and play files with this unit. Prepare one for use.
This unit uses microSD cards for recording and playback.
This unit can use microSD cards that are compatible with microSD, microSDHC or microSDXC standards.
A list of microSD cards that have been confirmed for use with this unit can be found on the TASCAM website. You can also contact TASCAM customer support service for information.
|
|
TASCAM website |
|
DR-10L Pro |
Precautions when handling microSD cards
microSD cards are delicate media.
In order to avoid damaging microSD cards, take the following precautions when handling them.
Do not leave them in extremely hot or cold places.
Do not leave them in extremely humid places.
Do not let them get wet.
Do not put things on top of them or twist them.
Do not hit them.
Do not remove or insert them during recording, playback, data transmission or other access.
Always put memory cards in cases when transporting them.
microSD cards formatted by this unit are optimized to improve performance during recording. Use this unit to format the microSD cards to be used with it.
Errors might occur when recording with this unit using a microSD card formatted by a computer or other device.
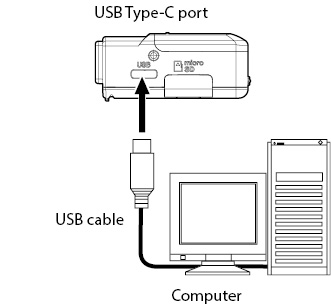
USB cables (for communication or data transmission)
Use a USB cable to connect this unit to a computer (Windows/Mac).
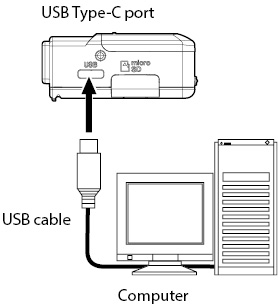
This unit has a USB Type-C port and is shipped with a Type-A to Type-C cable.
Prepare a USB cable suitable for the USB port of the computer being used. USB cables designed only for charging cannot be used.
Connecting to a computer with a USB Type-A port
Use the included Type-A to Type-C cable.
Connecting to a computer with a USB Type-C port
A commercially-available Type-C to Type-C cable is necessary.
Use monitoring equipment to monitor playback/input sound with this unit.
This unit has a 1/8” (3.5mm) stereo mini headphone jack. Please prepare headphones, earphones or other monitoring equipment.
1 - 5 Optional accessories (sold separately)
Optional accessory (sold separately). Please purchase this separately if needed.
AK-BT1 Bluetooth adapter
AK-BT1 Bluetooth adapter overview
Installing an AK-BT1 in this unit enables timecode synchronization with products made by Atomos as well as wireless remote control* using smartphones and tablets.
* The DR-10L Pro CONNECT remote control app can be used to simultaneously control and monitor up to 5 of these recorders.
Condensation could occur if the unit is moved from a cold place to a warm place, it is used immediately after a cold room has been heated or it is otherwise exposed to a sudden temperature change. If this occurs, let the unit sit for one to two hours before turning it on.
Use a dry soft cloth to wipe the unit clean. Do not wipe with chemical cleaning cloths, thinner, alcohol or other chemical agents.
Doing so could damage the surface or cause discoloration.
1 - 8 Precautions for placement and use
The operating temperature range of this unit is 0–40 °C.
Do not install this unit in the following types of locations. Doing so could degrade the sound quality and/or cause malfunctions.
Places with significant vibrations
Next to a window or in another location exposed to direct sunlight
Near heaters or other extremely hot places
Extremely cold places
Very humid or poorly ventilated places
Very dusty places
Places exposed directly to rain or other water
To enable good heat dissipation, do not place anything on top of the unit.
Do not place this unit on top of a power amplifier or other device that generates heat.
|
In case of the failure of the Product caused by the tapes or other media (“Media”) you used, the repair for the failure shall not be covered by the warranty of the Product and must be done at your own expense.
|
|
TEAC shall never be responsible for any damages due to the Media including but not limited to the corruption or breakage of the Product or the Media, dragging the tapes into the Product, and/or loss of data in whole or in part that arises out of or related to the use of the Media. That is the same for any damages such as lost profit, indirect or consequential damages, and/or special damages. * It is highly recommended that you shall take appropriate measures to prepare for the unexpected loss of data along with the Copyright Act of your country or region. |
1 - 9 About TASCAM customer support service
TASCAM products are supported and warrantied only in their country/region of purchase.
To receive support after purchase, on the TASCAM Distributors list page of the TEAC Global Site (https://teac-global.com/), search for the local company or representative for the region where you purchased the product and contact that organization.
When making inquiries, the address (URL) of the shop or web shop where it was purchased and the purchase date are required. Moreover, the warranty card and proof of purchase might also be necessary.
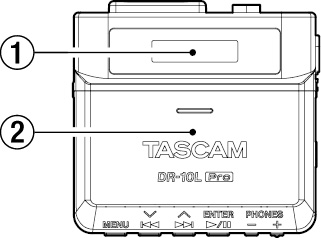
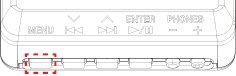
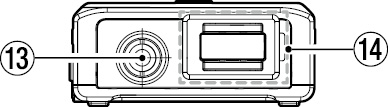
 Display
Shows a variety of information.
 Battery compartment and cover
Install 2 AAA batteries in this compartment to power the unit.
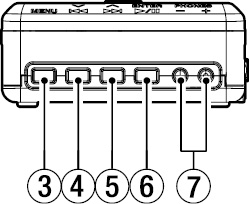
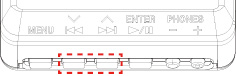
 MENU button
When the Home Screen is open, press this to open the Menu Screen.
When a Menu Screen is open, press this to return to the Home Screen.
When a setting item is shown, press this to return to the Menu Screen.

 [
[ ] button
During playback or when stopped in the middle of a file, press this to return to the beginning of the file.
Press this when located at the beginning of a file to skip to the previous file.
Press and hold this during playback to search backward.
Press this when the Menu Screen is open to show the previous menu item.
When a setting item is shown, press this to move the cursor left.
When inputting file names, use this to select characters.

 [
[ ] button
During playback or when stopped in the middle of a file, press this to skip to the next file.
Press and hold this during playback to search forward.
Press this when the Menu Screen is open to show the next menu item.
When a setting item is shown, press this to move the cursor right.
When inputting file names, use this to select characters.


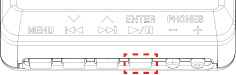
 [ENTER] button
When the Home Screen is open, press this to start file playback.
When the Menu Screen is open or a setting item is shown, press this to confirm the selected item.
Use this to verify confirmation messages.
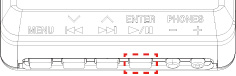
 PHONES +/– buttons
Use these to adjust the volume output from the headphone jack.
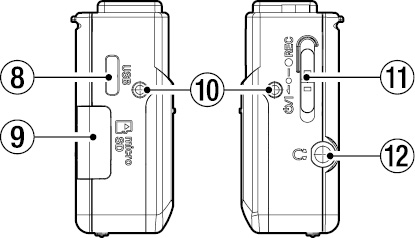
 USB Type-C port
This port is for connecting with a computer using a USB cable.
 microSD card slot
Use this slot to insert and remove microSD cards.
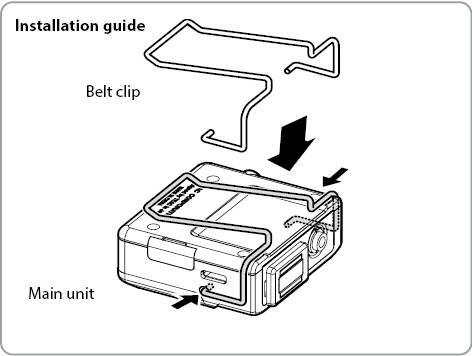
 Belt clip attachment points
Attach the included belt clip to these holes on the left and right.


 −
− REC switch
Slide this switch toward and hold it for about one second to turn the unit on/off.
Slide and hold this toward REC for about one second to start recording.
When recording, slide and hold this toward REC for about one second to stop recording.
NOTE
The one-second delay is intended to prevent accidental operation.
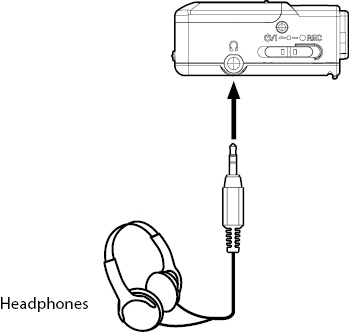
 Headphone jack (1/8” (3.5mm) stereo mini, dual mono output)
Connect stereo headphones to this stereo mini jack. The same signal is output to left and right (dual mono output).
 Input jack (1/8” (3.5mm) mini TRS (with screw lock))
This is an input for connecting a mic with a 3.5mm plug.
(Tip: MIC (BIAS), Ring: Open, Sleeve: GND)
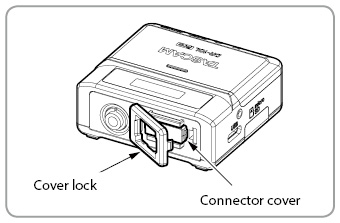
 Bluetooth adapter connector (with cover and cover lock)
This is for connecting an AK-BT1 Bluetooth adapter (sold separately).
This unit can operate on 2 AAA batteries (sold separately) or USB bus power using the included USB cable.
NOTE
This unit can use alkaline, Ni-MH or lithium AAA batteries.
Using AAA batteries (sold separately)
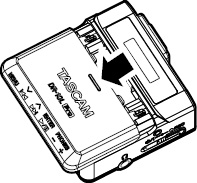
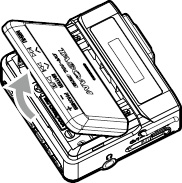
1.Open the battery compartment cover on the back of the unit.
While gently pressing the battery compartment cover, slide it and lift it slowly to open the compartment.
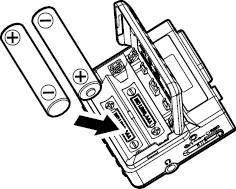
2.Install 2 AAA batteries with their  and
and  marks as shown in the battery compartment, and close the cover.
NOTE
When using AAA batteries, set the type of battery in order to accurately show the amount of power remaining and allow the unit to accurately determine whether power is available for proper operation. This is set to ALKALINE when shipped new from the factory. See “Setting the battery type” for procedures to change settings.
CAUTION
AAA manganese dry cell batteries cannot be used with this unit.
This unit cannot recharge AAA Ni-MH batteries. Use a commercially-available recharger.
Use the included USB cable to connect the unit to a USB port on a computer.
NOTE
If a computer is going to be used only to supply power, settings do not need to be made on this unit.
If USB bus power is supplied to this unit when its power is off, it will automatically turn on.
If both batteries and USB bus power are provided, the USB bus power supply will be used first.
CAUTION
If this unit is run only on USB bus power without batteries installed, it will turn off if the USB bus power supply is interrupted.
If the power turns off during operation, the equipment could be damaged and data could be lost, for example. We highly recommend installing batteries in the unit even when using USB bus power.
The unit should be connected directly to the computer, not through a USB hub.
Operation is not guaranteed when using a portable USB battery.
3 - 2 Connecting the microphone
1.Connect the plug of the included lavalier (pin) mic to the 1/8” (3.5mm) mini TRS input jack (which has a screw lock) on this unit.
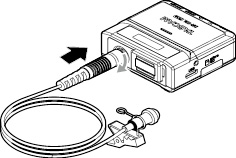
2.After connecting the mic jack, lock the connector using its screw lock.
NOTE
Refer to the illustration below to attach the included mic clip and windscreen.
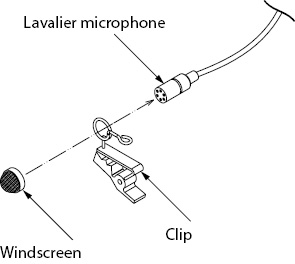
Wind noise could impact affect recording when outside or in other environments with strong wind. Use a windscreen designed for a small mic (available commercially).
Do not apply excessive force to the jack.
When connecting a mic other than the included lavalier (pin) mic, set the phase according to the type of mic. (see “Setting the phase”)
Suitable recording might not be possible if a mic made by a different manufacturer is used.
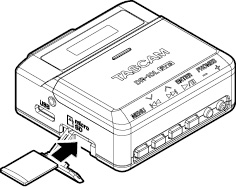
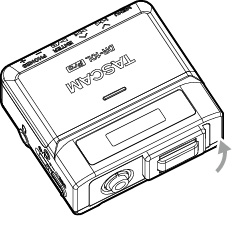
3 - 3 Inserting and removing microSD cards (sold separately)
1.Open the microSD card slot cover on the left side.
2.Insert the microSD card in the direction of the arrow as shown in the illustration below until it clicks into place.
NOTE
A screen encouraging formatting will appear if a microSD card that is new or has been formatted by a different device is inserted. (see “Formatting (initializing) microSD cards (sold separately)”)
If no microSD card has been inserted, the following message will appear on the display when the unit is turned on.

See the following for precautions related to handling microSD cards. (see “Precautions when handling microSD cards”)
To remove a microSD card, press it in gently and then release it to allow it to come out.
CAUTION
Never remove a microSD card during recording or playback, when being formatted or when writing data with a computer. Doing so could cause the equipment to be damaged or data to be lost, for example.
Be certain that the microSD card is not being accessed before removing it.
NOTE
The following will appear on the display if the microSD card is removed while the power is on.
3 - 4 Turning the unit on and off
CAUTION
|
|
While wearing headphones, do not connect or disconnect them or turn the unit on or off. Doing so might cause sudden loud noises, which could harm hearing. |
When the unit is off, slide the − REC switch toward and hold it for about one second.
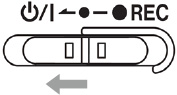
The unit will start up and TASCAM (the Startup Screen) will appear.
![]()
The Home Screen will appear after the unit starts up. (see “Home Screen”)

NOTE
When the unit is started up for the first time or when the built-in clock has been reset after being left unused without batteries, a screen will appear after the Startup Screen where the date and time can be set. (see “Setting the date and time”)
A screen encouraging formatting will appear after the Startup Screen if the power is turned on while a microSD card that is new or has been formatted by a different device is inserted. (see “Formatting (initializing) microSD cards (sold separately)”)
Supplying USB bus power to this unit when its power is off will automatically turn it on.
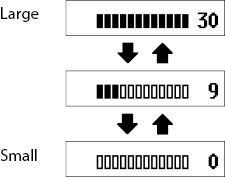
When the power is turned on, a power status icon is shown at the right side of the display on the unit.

A battery icon appears when batteries are being used.
The battery icon shows 8 levels of remaining power.
|
|
|
|
|
|
|
|
|
|
|
|
|
|
|
|
The battery is almost dead and the power will soon turn off if the ![]() icon with no bars blinks.
icon with no bars blinks.
When USB bus power is being supplied, the remaining battery indicator and ![]() appear alternately.
appear alternately.
If no batteries are installed in the unit, ![]() and
and ![]() will appear alternately.
will appear alternately.
When the unit is on, slide the − REC switch toward and hold it for about one second.
The unit power will turn off and the display will become unlit.
CAUTION
Always use the − REC switch to turn the unit off.
When the unit is on, do not remove the batteries or disconnect the USB cable if using USB bus power. Doing so will cause all recordings, settings and other data to be lost. Lost data and settings cannot be restored.
NOTE
When using USB bus power, the display will not become unlit. Instead, the following screen will appear.

If the USB cable is disconnected, the unit power will turn off and the display will become unlit.
If using batteries and the 15: POWER SAVE item on the Menu Screen is set to ON, the unit will turn itself off automatically when the unit is stopped and no operation has occurred for about 10 minutes.
The factory default setting is OFF. See “Setting the automatic power off function” for procedures to change settings.
NOTE
When using USB bus power, the display will not become unlit. Instead, the following screen will appear.
If the USB cable is disconnected, the unit power will turn off and the display will become unlit.
3 - 5 Setting the date and time
When the unit is started up for the first time or when the built-in clock has been reset after being left unused without batteries, a screen will appear after the Startup Screen where the date and time can be set.
NOTE
To set the date and time again, see “Setting the built-in clock”.
|
|
|
YY-MM-DD hh:mm |
|
YY: year, MM: month, DD: day, hh: hour, mm: minute |
1.Use the [] and [] buttons to change the numbers and use the [ENTER] button to move the cursor.
Press the [ENTER] button to move the cursor between the items from left to right: YY  MM DD hh mm.

2.When the cursor is at mm on the far right, press the [ENTER] button to confirm the date and time and restart the unit.

NOTE
The cursor cannot be moved back to a previous item (from right to left).
To redo the setting, restart the unit before confirming the date and time.
3 - 6 Formatting (initializing) microSD cards (sold separately)
A screen encouraging formatting will appear if a microSD card that is new or has been formatted by a different device is inserted.
|
|
or |
|
In order to use a microSD card in this unit, it must first be formatted by this unit.
CAUTION
Formatting will erase all data on a microSD card. Back up to a computer, for example before formatting a card.
NOTE
See “Formatting the SD card” for formatting procedures if the screen encouraging formatting does not appear or to reformat a microSD card that has already been formatted by this unit.
This is shown if the formatting of the SD card is not suitable for this unit.
1.Press the [ENTER] button.
2.When “Format Card?” is shown, press the [ENTER] button.
3.When “Are You Sure?” is shown, press the [ENTER] button.
This will start formatting.


After formatting completes, the following screen will appear.

This is shown if there is a discrepancy in the system file structure used by this unit.
1.Press the [ENTER] button.
2.When “Make System File?” is shown, press the [ENTER] button.
3.When “Are You Sure?” is shown, press the [ENTER] button.
This will start formatting.
After formatting completes, the following screen will appear.
NOTE
To prevent formatting, remove the microSD card while the confirmation message is open. The Home Screen will appear.
See “Inserting and removing microSD cards (sold separately)” for information about inserting microSD cards.
3 - 7 Connecting monitoring equipment
Connect monitoring equipment to the headphone jack in order to monitor playback/input sound with this unit.
CAUTION
|
|
While wearing headphones, do not connect or disconnect them or turn the unit on or off. Doing so might cause sudden loud noises, which could harm hearing. |
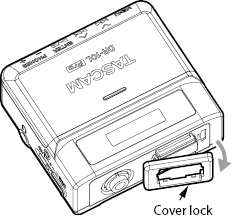
3 - 8 Installing an AK-BT1 Bluetooth adapter (sold separately)
Install an AK-BT1 Bluetooth adapter (sold separately) to connect this unit with other Bluetooth devices.
1.Remove the Bluetooth adapter connector cover from the unit.
2.After removing the connector cover, insert the AK-BT1 into the unit.
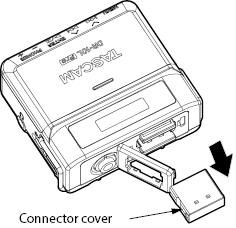
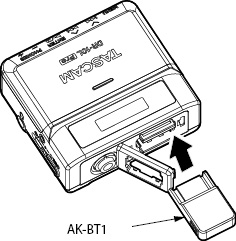
Insert the connector toward the unit’s display.
3.Reattach the cover in its original position.
See “Remote control functions” and “Timecode functions (Bluetooth)” for Bluetooth connection and use procedures.
The Home Screen appears after the unit starts up.
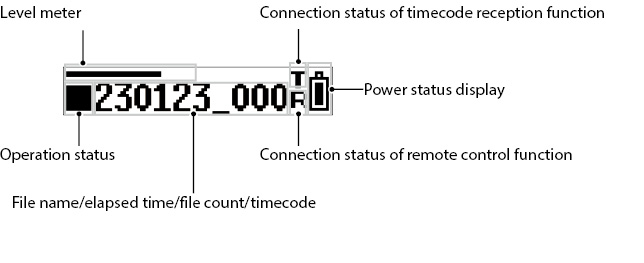
Level meter
This shows the input sound level.
Operation status
|
Indicator |
Operation status |
|
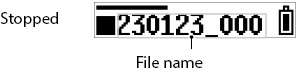
|
Stopped |
|
|
Paused |
|
|
Playing |
|
|
Searching forward |
|
|
Searching backward |
|
|
Recording |
|
|
Skipping to the beginning of the next file |
|
|
Skipping to the beginning of the current or previous file |
Connection status of timecode reception function
|
Indicator |
Operation status |
|
Blinking |
Waiting for connection with timecode device |
|
Blinking (1-second cycle) |
Timecode being received |
|
Lit |
Timecode running independently |
Power status display
|
Indicator |
Operation status |
|||
|
Indicator with 8 levels |
Using batteries This will blink when at the lowest level. |
|||
Shown alternately |
Using USB bus power |
Connection status of remote control function
|
Indicator |
Operation status |
|
Lit |
Remotely connected with dedicated control app |
|
Blinking |
Waiting to connect with dedicated control app |
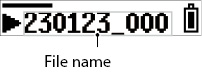
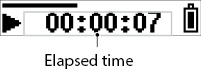
File name/elapsed time/file count/timecode
|
Indicator |
Operation status |
|
File name* 230123_0001.wav** |
Stopped When changing tracks When starting recording/playback |
|
Elapsed time [hh:mm:ss] (Hours: minutes: seconds) |
When recording/playing back |
|
File count [0001/0020] Current file/total number of files |
This will appear for one second after the following operations.
|
|
Timecode*** [hh:mm:ss:ff] (Hours: minutes: seconds: frames) |
When timecode is enabled |
* If no files that can be played back are saved on the microSD card, “NO FILE” will be shown. If a microSD card is not loaded, “NO CARD” will be shown.
** When the Home Screen is open, the file name, including the file format (extension), will scroll once and be shown.
*** To switch to timecode display, press and hold the [ENTER] button.
Press the MENU button to open the Menu Screen.
Various settings can be changed for this unit on the Menu Screen.
See “Menu item list” for a list of menu items.
Basic Menu Screen operation procedures
1.When the Home Screen is open, press the MENU button to open the Menu Screen.
|
|
|
|
|
|
|
|
2.Use the [] and [] buttons to select the menu item to set and press the [ENTER] button to show the setting items.
|
|
|
|
|
|
|
|
|
|
|
|
|
|
3.Use the [] and [] buttons to change the setting value/item.
|
|
|
|
|
|
|
|
4.Press the [ENTER] button to confirm the setting and return to the Menu Screen.
|
|
|
|
|
|
|
|
5.Repeat steps 2 to 4 as necessary to set each item.
6.When finished, press the MENU button to return to the Home Screen.
|
|
|
|
|
|
|
|
NOTE
After showing the last menu item, the first menu item will be shown next.
|
|
|
|
|
|
|
|
|
(etc.) |
|
|
|
|
|
|
|
|
Example when “28: FILE DELETE” is the last menu item
When there are multiple setting items that cannot be shown on a single line, arrows will be shown at the ends of items as in the screen examples below. Use the [] and [] buttons to change the setting item.
|
|
|
|
|
|
5 - 1 Starting and stopping recording
To start recording when the unit is on, slide the − REC switch toward REC for about one second.
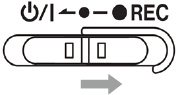
Recording can be started with a single operation even when this unit is off.
When the unit is off, slide and hold the − REC switch toward REC for about one second until TASCAM (the startup screen) appears and recording starts.
Slide the switch toward REC when recording for about one second to stop recording.
The following appears on the display when recording and when stopped.

NOTE
The one-second delay is intended to prevent accidental operation.
When recording, the only possible operations are stopping, changing the PHONE jack output volume and showing the available recording time. If other operations are attempted, “KEY LOCKED!” will appear in a pop-up message on the display for about one second.
A new file will be created automatically without pausing recording when the file size reaches 4 GB. (Track incrementing)
To record at the optimal volume, in addition to adjusting the mic orientation and distance from the sound source, change the recording level settings. (see “Setting the recording level”)
Monitoring input sound when recording or stopped is possible with this unit.
The effects of the recording level, low-cut filter, limiter and other functions can be checked.
The settings of each function can be set individually from the Menu Screen. For details, see “Recording settings”.
To adjust the volume when monitoring, press the PHONES +/– buttons to adjust the level output from the headphone jack. For details, see “Adjusting the headphone output volume”.
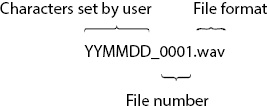
Recorded data is saved as audio files on the microSD card. Files are named according to the following rules.
|
|
|
Example with factory default settings |
Characters set by user
Characters set by the user are added to the file name.
TIP
When recording a TV drama or play, for example, setting user characters to the individual names of each performer can make identification easier when managing files and editing.
The factory default setting is “DATE” (6-digit date).
See “Characters set by user” for procedures to change settings.
File number
The order recorded is added to the file name.
The factory default setting is “0001”.
See “Setting the file number” for procedures to change settings.
File format
The recording format is added to the name of the recorded audio file.
.wav: WAV format used for recorded audio file
.mp3: MP3 format used for recorded audio file
The factory default setting is WAV format.
See “Setting the recording file format” for procedures to change recording format.
NOTE
If a file with the same user-set characters and file number already exists at the time of recording, “[---]” will be added after the file number. (--- is a three-digit number, starting with “001”.)
Example: YYMMDD_0001[001].wav
Checking the available recording time
When the unit is stopped or recording, press and hold the MENU button to show the remaining available recording time on the loaded microSD card for about 1 second.

5 - 2 Playing back, skipping and searching backward/forward
Starting and stopping playback
When the Home Screen is open and playback is stopped, press the [ENTER] button to start playback of the file currently shown on the display.
Press this button again to stop playback.
The display appears as below when playback starts and during playback.
|
When playback starts |
|
|
During playback |
|
NOTE
During playback, press and hold the MENU button to show the remaining time of the playing file.

Only files (.wav or .mp3) in the SOUND folder on the microSD card can be played back. Files put in a folder created using a computer, for example, cannot be played back.
During playback or when stopped in the middle of a file, press the [] button to return to the beginning of the file.
Press this when located at the beginning of a file to skip to the previous file.
During playback or when stopped in the middle of a file, press the [] button to skip to the next file.
Searching backward and forward
During playback, press and hold the [] button to start searching backward. Continue pressing and holding the [] button to accelerate the search speed.
Release the [] button to resume playback.
During playback, press and hold the [] button to start searching forward. Continue pressing and holding the [] button to accelerate the search speed.
Release the [] button to resume playback.
NOTE
While searching,  or
or  will be shown.

5 - 3 Adjusting the headphone output volume
Use the PHONES +/– buttons to adjust the volume output from the headphones jack.
Pressing a button will adjust the volume by one level.
Pressing and holding a button will adjust the volume continuously.
Minimum value: 0
Maximum value: 30
This is set to 8 when shipped new from the factory.
NOTE
The volume is shown on the display. The screen will return to normal 1 second after button operation.
6 - 1 File and folder overview
Recorded data is saved as audio files in the SOUND folder on the microSD card.
Formatting microSD cards with this unit will create SOUND and UTILITY folders.
Folder hierarchy example
This illustration is an example of the folder hierarchy on a microSD card used with this unit.
|
¥ (root folder) |
|||||
|
SOUND |
|||||
|
DR0000_0001.wav (recording file) |
|||||
|
DR0000_0002.wav (recording file) |
|||||
|
230123_0003.wav (recording file) |
|||||
|
DR-10LPro_0004.wav (recording file) |
|||||
|
DR0000_0005.wav (recording file) |
|||||
|
... |
|||||
|
DR0000_0014.wav (recording file) |
|||||
|
... |
|||||
|
UTILITY |
|||||
|
Firmware update files |
|||||
The maximum total number of files is 1000.
These recording file names are examples.
Use menu item 28: FILE DELETE to delete recorded files with this unit.
This deletes the file currently shown on the display.
CAUTION
Deleted files cannot be restored. Be careful not to make a mistake when deleting files.
1.When the Home Screen is open, use the [] and [] buttons to show the file to be deleted on the display.

2.Press the MENU button to open the Menu Screen.

3.Use the [] and [] buttons to select 28: FILE DELETE, and press the [ENTER] button.

4.Use the [] and [] buttons to select YES, and press the [ENTER] button.

This deletes the file.
After deletion completes, the Menu Screen reappears.
When the Home Screen is reopened, the file after the deleted file will be shown on the display. If there was no file after it, the file that was before it will be shown.
TIP
Files can also be deleted by connecting a computer by USB to this unit and accessing the microSD card loaded in it. See “Connecting with a computer using USB” for details about connecting computers.
The audio signal level recorded in recording files can be set.
Setting items (default value underlined)
HIGH / HIGH-MID / MID / MID-LOW / LOW
1.When the Home Screen is open, press the MENU button to open the Menu Screen.
2.Use the [] and [] buttons to select 01: REC LEVEL, and press the [ENTER] button.
3.Use the [] and [] buttons to select the setting item, and press the [ENTER] button.


Check the level meter on the Home Screen, and change the setting so that it exceeds the center slightly.
NOTE
If the 04: AUTO LEVEL item on the Menu Screen is set to ON, it will be reset to OFF when the 01: REC LEVEL setting is changed.
When this happens, “AUTO LVL Cancel” will appear in a pop-up message for about one second.
To use the auto level function, after setting the 01: REC LEVEL item, set the 04: AUTO LEVEL item to ON again.
The cutoff frequency of the low-cut filter used on the mic input can be set.
This cuts audio below the selected frequency.
The low-cut filter can reduce bothersome noise, such as from wind, air-conditioners and projectors.
Set the cutoff frequency of the low-cut filter to match the noise.
Setting items (default value underlined)
OFF / 40Hz / 80Hz / 120Hz / 220Hz
1.When the Home Screen is open, press the MENU button to open the Menu Screen.
2.Use the [] and [] buttons to select 02: LOW CUT, and press the [ENTER] button.

3.Use the [] and [] buttons to select the setting item, and press the [ENTER] button.


The limiter prevents distortion when signals that are too loud are input suddenly.
The limiter function can be turned on or off.
Setting items (default value underlined)
OFF / ON
1.When the Home Screen is open, press the MENU button to open the Menu Screen.
2.Use the [] and [] buttons to select 03: LIMITER, and press the [ENTER] button.

3.Use the [] and [] buttons to select the setting item, and press the [ENTER] button.

NOTE
Distortion of sounds may occur when signals that are very loud are input even if the LIMITER function is activated. In such a case, change the Menu Screen 01: REC LEVEL item setting to lower the recording level, or increase the distance of the mic from the sound source.
Setting the auto level function
When the input sound level is too low or too high, this function can automatically increase or decrease the recording level to an appropriate level.
The auto level function can be turned on or off.
When this function is on, the input level will be adjusted automatically in response to the input audio.
Setting items (default value underlined)
OFF / ON
1.When the Home Screen is open, press the MENU button to open the Menu Screen.
2.Use the [] and [] buttons to select 04: AUTO LEVEL, and press the [ENTER] button.

3.Use the [] and [] buttons to select the setting item, and press the [ENTER] button.
NOTE
If the 04: AUTO LEVEL item on the Menu Screen is set to ON, it will be reset to OFF when the 01: REC LEVEL setting is changed.
When this happens, “AUTO LVL Cancel” will appear in a pop-up message for about one second.
To use the auto level function, after setting the 01: REC LEVEL item, set the 04: AUTO LEVEL item to ON again.
When using mics other than the included one, some output positive signals and others output negative signals. Set this according to the connected mic type.
Setting items (default value underlined)
DEFAULT / INVERT
DEFAULT: Record as a positive signal when positive sound pressure is input using the included mic.
INVERT: Record as a negative signal (signal with phase inverted) when positive sound pressure is input using the included mic.
NOTE
The included mic outputs negative signals. The DEFAULT setting records as a positive signal.
1.When the Home Screen is open, press the MENU button to open the Menu Screen.
2.Use the [] and [] buttons to select 05: PHASE, and press the [ENTER] button.

3.Use the [] and [] buttons to select the setting item, and press the [ENTER] button.


Setting the recording file format
This sets the recording format used for recorded audio files.
Setting items (default value underlined)
WAV / MP3H / MP3L
WAV: WAV format will be used for recording audio files.
MP3H: MP3 format (192kbps) will be used for recording audio files.
MP3L: MP3 format (128kbps) will be used for recording audio files.
1.When the Home Screen is open, press the MENU button to open the Menu Screen.
2.Use the [] and [] buttons to select 06: FILE FORMAT, and press the [ENTER] button.

3.Use the [] and [] buttons to select the setting item, and press the [ENTER] button.

NOTE
The 44.1kHz/48kHz sampling frequency and MONO (mono)/POLY (stereo) recording file type settings will be applied to audio files recorded in MP3 format. Stereo files, however, will have the same data on both left and right channels.
Setting the WAV recording file type
The type of WAV recording file can be set.
Setting items (default value underlined)
MONO / POLY
MONO: Files will be handled as mono files.
POLY: Files will be handled as stereo files. (The same data will be on both left and right channels.)
1.When the Home Screen is open, press the MENU button to open the Menu Screen.
2.Use the [] and [] buttons to select 07: FILE TYPE, and press the [ENTER] button.

3.Use the [] and [] buttons to select the setting item, and press the [ENTER] button.

Setting the sampling frequency
The sampling frequency used for recording can be set.
Setting items (default value underlined)
44.1kHz / 48kHz
1.When the Home Screen is open, press the MENU button to open the Menu Screen.
2.Use the [] and [] buttons to select 08: REC FORMAT, and press the [ENTER] button.

3.Use the [] and [] buttons to select the setting item, and press the [ENTER] button.

Setting the quantization bit depth
The quantization bit depth used when recording can be set.
Setting items (default value underlined)
16bit / 24bit / 32-bit float
1.When the Home Screen is open, press the MENU button to open the Menu Screen.
2.Use the [] and [] buttons to select 09: BIT DEPTH, and press the [ENTER] button.

3.Use the [] and [] buttons to select the setting item, and press the [ENTER] button.


|
32-bit float This unit supports 32-bit float recording. Files recorded using 32-bit float have the following advantages when being edited afterward.
|
|
|
CAUTION |
|
|
Analog clipping will not be changed when volume is lowered. |
|
7 - 3 Setting recording file names
Files for data recorded by this unit are named according to the following rules.
|
|
|
Example with factory default settings |
The format used for the characters added to file names can be set.
Setting items (default value underlined)
TEXT / DATE / UNIT NAME
TEXT: Chosen characters (6) are used for the file name.
Example: DR0000_0001.wav
DATE: The 6-digit date is used for the file name.
Example: 110101_0001.wav
UNIT NAME: The name of the individual device is used for the file name.
Example: DR-10LPro_0001.wav
1.When the Home Screen is open, press the MENU button to open the Menu Screen.
2.Use the [] and [] buttons to select 12: FILE NAME, and press the [ENTER] button.

3.Use the [] and [] buttons to select the setting item, and press the [ENTER] button.


TIP
When recording a TV drama or play, for example, setting TEXT or UNIT NAME to the individual names of each performer can make identification easier when managing files and editing.
If DATE is selected, the file name will be created using the date and time of the unit’s internal clock. Set the clock in advance to enable recording with the correct date and time.
NOTE
Use the Menu Screen 13: TEXT item to set the TEXT characters. See “Setting TEXT” for setting procedures.
The UNIT NAME must be set in advance using the dedicated control app. See the manual for the dedicated control app for setting procedures. If the UNIT NAME has not been set, “DR-10LPro” will be used for file names.
These 6 characters can be set by the user as desired.
Setting items (default value underlined)
DR0000
1.When the Home Screen is open, press the MENU button to open the Menu Screen.
2.Use the [] and [] buttons to select 13: TEXT, and press the [ENTER] button.

3.Press the [ENTER] button to move the cursor from left to right one character at a time.

4.Use the [] and [] buttons to change the character at the cursor position.
In addition to the alphabet and numbers, the following characters can be used:
! # $ % & ’( ) + , - . ; = @ [ ] ^ _ ` { } ~
5.When the cursor is at the character on the far right, press the [ENTER] button to confirm the file name and return to the Menu Screen.
NOTE
To use the set characters for file names, the Menu Screen 12: FILE NAME item must be set to TEXT.
Using more or less than 6 characters is not possible.
TIP
When using more than one of these units, you can set the file name in advance to identify which units were used to record files. This can be convenient when editing files.
Examples
|
Characters set for TEXT |
File name |
|
|
1st unit |
DR0001 |
[DR0001_0001.wav] |
|
2nd unit |
DR0002 |
[DR0002_0001.wav] |
|
3rd unit |
DR0003 |
[DR0003_0001.wav] |
|
: |
: |
: |
|
10th unit |
DR0010 |
[DR0010_0001.wav] |
The file number that will be used the next time a file is created can be set.
Setting items (default value underlined)
0001
1.When the Home Screen is open, press the MENU button to open the Menu Screen.
2.Use the [] and [] buttons to select 16: FILE NUMBER, and press the [ENTER] button.

3.Press the [ENTER] button to move the cursor from left to right one digit at a time.

4.Use the [] and [] buttons to change the number at the cursor position.
5.When the cursor is at the digit on the far right, press the [ENTER] button to confirm the file number and return to the Menu Screen.
The set file number will be enabled from the next recording.
NOTE
If a file with the same name and number already exists at the time of recording, “[---]” will be added after the file number. (--- is a three-digit number from 001 to 999.)
If the METADATA function has been turned on using the dedicated control app, “Not Available” will be shown when 16: FILE NUMBER is selected and the [ENTER] button is pressed.
The recording format is added to the name of the recorded audio file.
.wav: WAV format used for recorded audio file
.mp3: MP3 format used for recorded audio file
The factory default setting is WAV format.
See “Setting the recording file format” for procedures to change recording format.
Setting the automatic power off function
When using batteries, this function will turn the unit off automatically if it is stopped and no operation has occurred for about 10 minutes. This function can be turned on or off.
Setting items (default value underlined)
OFF / ON
1.When the Home Screen is open, press the MENU button to open the Menu Screen.
2.Use the [] and [] buttons to select 15: POWER SAVE, and press the [ENTER] button.

3.Use the [] and [] buttons to select the setting item, and press the [ENTER] button.
NOTE
When using USB bus power, the display will not become unlit. Instead, the following screen will appear.
If the USB cable is disconnected, the unit power will turn off and the display will become unlit.
This setting controls the brightness of the display backlight.
Setting items (default value underlined)
ALWAYS / 5sec / 30sec
ALWAYS: Backlight always stays on
5sec: Backlight stays on for 5 seconds after last operation
30sec: Backlight stays on for 30 seconds after last operation
1.When the Home Screen is open, press the MENU button to open the Menu Screen.
2.Use the [] and [] buttons to select 17: BACKLIGHT, and press the [ENTER] button.

3.Use the [] and [] buttons to select the setting item, and press the [ENTER] button.


This unit can format SD cards.
Setting items (default value underlined)
QUICK / ERASE
QUICK: Execute quick formatting.
ERASE: Erase and format the card.
CAUTION
Formatting will erase all data on a microSD card. Back up to a computer, for example before formatting a card.
When formatting a card, the unit should be operating on USB bus power supplied from a connected computer or batteries with sufficient remaining power.
1.When the Home Screen is open, press the MENU button to open the Menu Screen.
2.Use the [] and [] buttons to select 18: FORMAT SD, and press the [ENTER] button.

3.Use the [] and [] buttons to select the setting item, and press the [ENTER] button.

4.Use the [] and [] buttons to select YES, and press the [ENTER] button.
This will start formatting.
After formatting completes, the following screen will appear.
NOTE
Using the ERASE format option might improve writing performance that has decreased due to repeated use.
Erase-formatting checks for memory errors as it formats, so it takes more time compared to QUICK formatting.
A screen encouraging formatting will appear if a microSD card that is new or has been formatted by a different device is inserted. Refer to “If “Format Error” is shown” and “If “File Not Found” is shown” when formatting.
Use this to set the type of battery used.
This setting is used to show the amount of remaining battery charge and determine if the unit has enough power for normal operation.
Setting items (default value underlined)
ALKALINE / Ni-MH / LITHIUM
ALKALINE: AAA alkaline batteries
Ni-MH: AAA nickel-metal hydride batteries
LITHIUM: AAA lithium batteries
CAUTION
If the battery setting does not match the type of battery being used, the unit could determine that the remaining battery charge has become insufficient even after a short amount of use and turn itself off. Always set this according to the type of battery being used.
1.When the Home Screen is open, press the MENU button to open the Menu Screen.
2.Use the [] and [] buttons to select 19: BATTERY, and press the [ENTER] button.

3.Use the [] and [] buttons to select the setting item, and press the [ENTER] button.


The unit’s internal clock can be set.
Setting item (“00-01-01 00:00” by default)
YY-MM-DD hh:mm

|
YY |
Year |
|
MM |
Month |
|
DD |
Day |
|
hh |
Hour |
|
mm |
Minute |
NOTE
The first time the unit is turned on after purchase and whenever the date and time has been reset, a screen where the date and time can be set will open. (see “Setting the date and time”)
1.When the Home Screen is open, press the MENU button to open the Menu Screen.
2.Use the [] and [] buttons to select 20: DATE/TIME, and press the [ENTER] button.

3.Use the [] and [] buttons to change the numbers and use the [ENTER] button to move the cursor.
Press the [ENTER] button to move the cursor between the items from left to right: YY MM DD hh mm.
4.When the cursor is at mm on the far right, press the [ENTER] button to confirm the date and time and return to the Menu Screen.
NOTE
The cursor cannot be moved back to a previous item (from right to left).
Pressing the HOME button before completing the setting will cancel the changes and return to the Menu Screen.
The unit can be reset to its factory default settings.
Setting items (default value underlined)
NO / YES
NO: Return to the Menu Screen.
YES: Initialize the settings. After formatting completes, the Menu Screen reappears.
1.When the Home Screen is open, press the MENU button to open the Menu Screen.
2.Use the [] and [] buttons to select 21: SYSTEM INIT, and press the [ENTER] button.

3.Use the [] and [] buttons to select YES, and press the [ENTER] button.
This will start initialization.


After initialization completes, the Menu Screen will reappear.
Press the MENU button to open the Menu Screen. This list provides an overview of the various menu items.
|
Menu item |
Setting items (default value underlined) or display content |
Explanation |
While recording (remote operation) |
|
01: REC LEVEL |
HIGH / HIGH-MID / MID / MID-LOW / LOW |
Use to set the audio signal level recorded in recording files. |
|
|
02: LOW CUT |
OFF / 40Hz / 80Hz / 120Hz / 220Hz |
Turn the mic input low-cut filter function on or off. |
|
|
03: LIMITER |
OFF / ON |
Turn the limiter function on or off. |
|
|
04: AUTO LEVEL |
OFF / ON |
Turn the auto level function on or off. |
|
|
05: PHASE |
DEFAULT / INVERT |
Use to set the phase according to the type of mic connected. |
|
|
06: FILE FORMAT |
WAV / MP3H / MP3L |
Use to set the recording file format |
|
|
07: FILE TYPE |
MONO / POLY |
Use to set the type of file used for WAV recording. |
|
|
08: REC FORMAT |
44.1kHz / 48kHz |
Use to set the sampling frequency setting. |
|
|
09: BIT DEPTH |
16bit / 24bit / 32-bit float |
Use to set the quantization bit depth. |
|
|
10: TIME MARK |
OFF / 5min / 10min / 15min / 30min / 60min |
Use to turn the time mark function on or off. |
|
|
11: PEAK MARK |
OFF / ON |
Use to turn the peak mark function on or off. |
|
|
12: FILE NAME |
TEXT / DATE / UNIT NAME |
Use to set the format of names given to files recorded by this unit. |
|
|
13: TEXT |
[DR0000] |
Use to set the characters added to file names when recording. |
|
|
14: UNIT NAME |
Not Available |
This shows the individual name set for the unit. If the UNIT NAME has not been set, “Not Available” will be shown. |
|
|
15: POWER SAVE |
OFF / ON |
Use to turn on/off the automatic power saving function when using batteries. |
|
|
16: FILE NUMBER |
[0001] or Not Available |
The file number that will be used the next time a file is created can be set. “Not Available” will be shown if the METADATA function has been turned on using the dedicated control app. |
|
|
17: BACKLIGHT |
ALWAYS / 5sec / 30sec |
This setting controls the brightness of the display backlight. |
|
|
18: FORMAT SD |
QUICK / ERASE |
Use this to format the microSD card in the unit. |
|
|
19: BATTERY |
ALKALINE / Ni-MH / LITHIUM |
Use this to set the type of battery used. |
|
|
20: DATE/TIME |
YY-MM-DD hh:mm |
Use this to set the unit’s internal clock. |
|
|
21: SYSTEM INIT |
Sure? NO / YES |
Use this to restore the various settings of this unit to their default values. |
|
|
22: VER INFO |
V-.-- B--- |
This is the firmware version used by the unit. |
|
|
23: AK-BT1 VER |
*.*.*-*** or Not Available |
This is the software version used by the AK-BT1 installed in the unit. “Not Available” will be shown if none has been installed. |
|
|
24: CARD READER |
— |
Use this to switch the USB connection mode of the unit to USB mass storage mode. |
|
|
25: BLUETOOTH |
OFF / REMOTE / TIMECODE |
Use this to switch between remote control and timecode functions when connected by Bluetooth. |
|
|
26: TC FORGET |
Sure? NO / YES or Not Available |
This initializes timecode function pairing data when connected by Bluetooth. “Not Available” will be shown if no pairing data has been saved and initialization is unnecessary. |
|
|
27: BT ID |
10LPro-****** |
This is the device name that will appear by default when searching for devices in the dedicated control app. The serial number (******) of this unit will be shown. |
|
|
28: FILE DELETE |
Sure? NO / YES |
This deletes the file currently shown on the display. |
|
|
29: LTC SYNC |
— |
Use the input jack of this unit to enable LTC synchronization with a timecode generator. |
NOTE
The dedicated control app can be used during recording to change settings for items with  in the “While recording (remote operation)” column. See the manual for the dedicated control app for operation procedures.
This unit can add marks during recording. Data for added marks is stored in the recording files.
The types of marks and conditions when they are added are as follows.
Time marks
Marks added when set time elapses
Peak marks
Marks added when the input signal exceeds the peak level
BOF marks
Marks added when microSD card write errors occur during recording
Manual marks
Marks added manually (only using the dedicated control app)
Marks can be added automatically when a set recording time elapses.
Setting the time mark function
Use the Menu Screen 10: TIME MARK item to set the time mark function. Set the time used to add marks.
Setting items (default value underlined)
OFF / 5min / 10min / 15min / 30min / 60min
1.When the Home Screen is open, press the MENU button to open the Menu Screen.
2.Use the [] and [] buttons to select 10: TIME MARK, and press the [ENTER] button.

3.Use the [] and [] buttons to select the setting item, and press the [ENTER] button.


Marks can be added automatically when input signals exceed the peak level during recording.
This can be used after recording to find parts where the peak level was exceeded.
Setting the peak mark function
Use the Menu Screen 11: PEAK MARK item to set the peak mark function. Use to turn the peak mark function on or off.
Setting items (default value underlined)
OFF / ON
1.When the Home Screen is open, press the MENU button to open the Menu Screen.
2.Use the [] and [] buttons to select 11: PEAK MARK, and press the [ENTER] button.

3.Use the [] and [] buttons to select the setting item, and press the [ENTER] button.
BOF marks are added automatically when microSD card write errors occur during recording. BOF marks are added at locations where audio is interrupted.
The dedicated control app can be used to add manual marks at desired locations.
See the manual of the dedicated control app for operation procedures.
When this unit is connected to a computer, it can receive USB bus power supplied from that computer.
In addition, by switching the setting to USB mass storage mode, the microSD card loaded in the unit can be accessed.
10 - 1 Connecting with a computer
Connect the unit to a computer using the included USB cable as shown in the illustration below.
When USB bus power is being supplied, the remaining battery indicator and ![]() will be shown alternately for the power supply status.
will be shown alternately for the power supply status.
If no batteries are installed in the unit, ![]() and
and ![]() will be shown alternately.
will be shown alternately.
NOTE
If a computer is going to be used only to supply power, settings do not need to be made on this unit.
If USB bus power is supplied to this unit when its power is off, it will automatically turn on.
If both batteries and USB bus power are provided, the USB bus power supply will be used first.
CAUTION
When this unit is run only on USB bus power without batteries installed, it will turn off if the USB bus power supply is interrupted.
If the power turns off during operation, the equipment could be damaged and data could be lost, for example. We highly recommend installing batteries in the unit even when using USB bus power.
The unit should be connected directly to the computer, not through a USB hub.
10 - 2 Accessing microSD cards from a computer
Use this to switch the USB connection mode of the unit to USB mass storage mode.
Switching to USB mass storage mode
1.When the Home Screen is open, press the MENU button to open the Menu Screen.
2.Use the [] and [] buttons to select 24: CARD READER, and press the [ENTER] button.

The CARD READER Screen will open.

When connected by USB, the following screens will appear alternately.
|
|
|
|
Accessing the microSD card in the unit will become possible when it is recognized by the computer.
Exchanging files with computers
1.Click the “DR-10LPro” (or UNIT NAME) drive.
“SOUND” and “UTILITY” folders will be shown.
2.To transfer files from the computer, drag and drop the desired audio files on the computer to the SOUND folder.
3.To transfer files from the microSD card to the computer, drag and drop the desired audio files from the SOUND folder to any folder on the computer.
NOTE
If the microSD card has been formatted by a device that has UNIT NAME set, that name will be used as the volume label of that card. If UNIT NAME has not been set, the volume label will be “DR-10LPro”.
The volume label will be shown as the drive name on the computer.
This unit can record and play wav (including BWF) and mp3 files.
To remove the microSD card loaded in this unit from the computer when connected in USB mass storage mode, follow the procedures specified by that computer.
When “CARD READER” and “Push MENU to Exit” are being shown alternately, press the MENU button to end the connection with the computer and return to the Home Screen.
When an AK-BT1 Bluetooth adapter (sold separately) is connected to the Bluetooth device connector of this unit, DR-10L Pro CONNECT, the dedicated control app, can be used to remotely control the unit wirelessly from a smartphone or tablet.
DR-10L Pro CONNECT can simultaneously control up to 5 DR-10L Pro units.
DR-10L Pro CONNECT can also retain information for up to 99 DR-10L Pro units.
NOTE
The dedicated control app for this unit and a supported Atomos product cannot be used at the same time.
Referring to “Installing an AK-BT1 Bluetooth adapter (sold separately)”, install the AK-BT1 Bluetooth adapter beforehand.
The unobstructed transmission distance of the AK-BT1 Bluetooth adapter is about 10 m. (The transmission distance is only an estimate. The transmission distance may vary depending on the surrounding environment and radio wave conditions.)
11 - 1 Turning on remote control function
Use the Menu Screen 25: BLUETOOTH item to set the remote control function
Setting items (default value underlined)
OFF / REMOTE / TIMECODE
1.When the Home Screen is open, press the MENU button to open the Menu Screen.
2.Use the [] and [] buttons to select 25: BLUETOOTH, and press the [ENTER] button.

3.Use the [] and [] buttons to select REMOTE, and press the [ENTER] button.

While waiting to connect with the dedicated control app, the ![]() icon will blink on the right side of the Home Screen.
icon will blink on the right side of the Home Screen.
![]()
11 - 2 Installing the dedicated control app
1.Connect the smartphone or tablet device to the Internet.
NOTE
Please be aware that you are responsible for any transmission costs related to Internet connection.
2.Search for “DR-10L Pro CONNECT” on Google Play for an Android device or on the App Store for an iOS device. Then, download and install it.
11 - 3 Connecting with the dedicated control app
1.Enable Bluetooth connection on the smartphone or tablet.
CAUTION
Do not execute pairing from the Bluetooth device list screen of an iOS/iPadOS or Android device. If pairing has been conducted, remove the pairing.
Always launch DR-10L Pro CONNECT and then connect.
When using an Android device, set Location to “On”, and set “Location permission” for DR-10L Pro CONNECT to “Allow” or “Allow only while in use”.
NOTE
Refer to the operation manual of the device being used for procedures.
2.Use the smartphone or tablet to launch DR-10L Pro CONNECT.

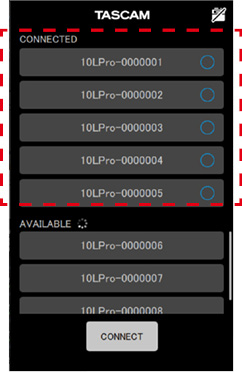
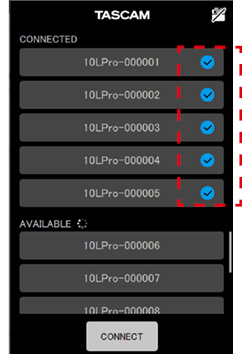
3.Tap “SEARCH DEVICES” on the opening screen.
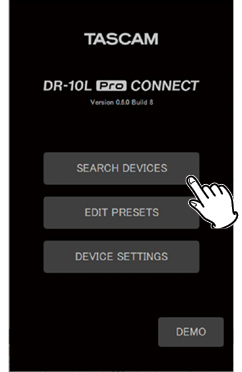
Smartphone/tablet device screen
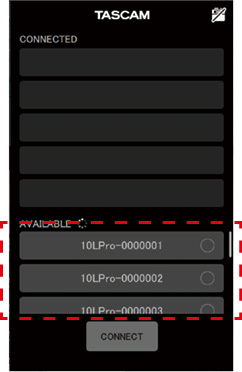
Devices that can be connected will be shown in the AVAILABLE list.
NOTE
Since the app remembers the CONNECTED list, the previous state will be shown the next time it is launched.
New devices cannot be found if there is device data for 99 units already. Device data can be removed from the DEVICE SETTINGS Screen to enable finding new devices. See the DR-10L Pro CONNECT manual for how to remove devices.
4.Tap the device that you want to connect.

It will be added to the CONNECTED list.
NOTE
Up to 5 devices can be added to the CONNECTED list.
Tap a device shown in the CONNECTED list to return it to the AVAILABLE list.
|
|
|
Example with 5 devices added to the list |
When a device is added to the CONNECTED list, it will begin connection standby and connection will automatically be attempted.
A check will appear when connection completes.
NOTE
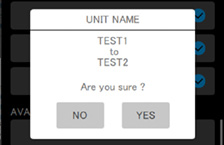
If the UNIT NAME has been set on the DEVICE SETTINGS Screen, the UNIT NAME data will be registered on the unit after connection completes.
If a different UNIT NAME is already saved on the unit, the following pop-up will appear.
|
|
|
Example when the UNIT NAME in the app is “TEST1” and the UNIT NAME on the unit is “TEST2” |
|
NO |
Set the app UNIT NAME (“TEST1”) as the unit name on the DR-10L Pro unit. |
|
YES |
Set the DR-10L Pro UNIT NAME (“TEST2”) as the unit name in the app. |
If a UNIT NAME has been set on the DR-10L Pro unit but not in the app, the UNIT NAME set on the unit will be added to the app settings.
TIP
When recording a TV drama or play, for example, setting UNIT NAME to the individual names of each performer can make identification easier when managing files and editing.
5.Tap the CONNECT button.
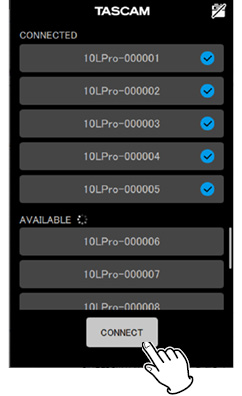
The Home Screen will appear.
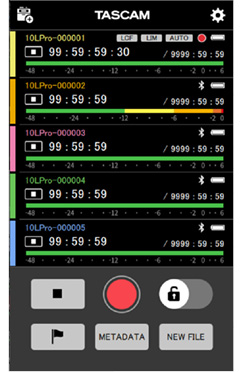
While connected with the dedicated control app, the ![]() icon will appear on the right side of the Home Screen.
icon will appear on the right side of the Home Screen.
![]()
See the manual of the dedicated control app for operation procedures.
NOTE
Monitoring sound is not possible on paired devices. Use the headphone jack on the unit.
When the unit is showing a menu or loading setting data, the display for the corresponding unit in the dedicated control app will also show that setting data is being loaded.
By connecting an AK-BT1 Bluetooth adapter (sold separately) to the Bluetooth device port on this unit, connection with a supported Atomos product to receive timecode is possible.
Received timecode is written to files recorded by this unit in WAV (BWF) format. Using this timecode data simplifies the aligning of video and audio files created by multiple units.
NOTE
If the recording format is set to MP3, timecode cannot be added to recording files.
The dedicated control app for this unit and timecode synchronization with a supported Atomos product cannot be used at the same time.
Referring to “Installing an AK-BT1 Bluetooth adapter (sold separately)”, install the AK-BT1 Bluetooth adapter beforehand.
12 - 1 Turning on the timecode function
Use the Menu Screen 25: BLUETOOTH item to set the TIMECODE function.
Setting items (default value underlined)
OFF / REMOTE / TIMECODE
1.When the Home Screen is open, press the MENU button to open the Menu Screen.
2.Use the [] and [] buttons to select 25: BLUETOOTH, and press the [ENTER] button.
3.Use the [] and [] buttons to select TIMECODE, and press the [ENTER] button.

If an AK-BT1 Bluetooth adapter has been installed, it will begin switching functions.


After switching, it will search for a supported Atomos product.


NOTE
If an AK-BT1 Bluetooth adapter has not been installed, it will not switch functions. If an AK-BT1 Bluetooth adapter is installed in the unit, it will switch functions when its operation is stopped and the Home Screen is open.
Pressing the MENU button while searching will cancel searching and reopen the Menu Screen. This will turn off the 25: BLUETOOTH setting.
If the unit power is turned off without pairing, the 25: BLUETOOTH setting will be turned off.
12 - 2 Pairing with supported Atomos products
When the unit’s timecode function is turned on, it will automatically search for and pair with supported Atomos products.
While connecting, the ![]() icon will blink.
icon will blink.
When pairing completes, “CONNECTED” will appear, and timecode received from a supported Atomos product that is connected can be checked.
After connection completes the ![]() icon will appear unblinking.
icon will appear unblinking.
To switch to timecode display, press and hold the [ENTER] button.
NOTE
If the unit power is turned off without pairing, the 25: BLUETOOTH setting will be turned off.
When the one touch recording function has been used to turn the unit on (see “One touch recording”), the unit will search for Bluetooth devices after one touch recording completes.
If connection is interrupted, causing the unit to run independently, the ![]() icon will appear unblinking.
icon will appear unblinking.
12 - 3 Ending pairing with supported Atomos products
To end pairing, set the Menu Screen 25: BLUETOOTH item to off.
1.When the Home Screen is open, press the MENU button to open the Menu Screen.
2.Use the [] and [] buttons to select 25: BLUETOOTH, and press the [ENTER] button.
3.Use the [] and [] buttons to select OFF, and press the [ENTER] button.
When the unit’s timecode function is turned off, it will automatically end pairing with supported Atomos products.
12 - 4 Pairing with a different supported Atomos product
Initialize the pairing data to connect with a different supported Atomos product when already paired with a supported Atomos product.
Initializing will enable pairing with a different device.
To initialize pairing data, use 26: TC FORGET on the Menu Screen.
Setting items (default value underlined)
NO / YES
NO: Return to the Menu Screen.
YES: Initialize the data. After formatting completes, the Menu Screen reappears. If connected, the connection will be interrupted.
1.When the Home Screen is open, press the MENU button to open the Menu Screen.

2.Use the [] and [] buttons to select 26: TC FORGET, and press the [ENTER] button.

3.Use the [] and [] buttons to select YES, and press the [ENTER] button.

This will initialize the pairing data
NOTE
“Not Available” will be shown if no pairing data has been saved and initialization is unnecessary. Press the MENU button to return to the Menu Screen.
12 - 5 Using remote control with timecode running free
The remote control app can be used with the unit running free using the timecode that it last received.
1.Turn on the timecode function and synchronize the timecode with a supported Atomos product. (see “Turning on the timecode function”) (see “Pairing with supported Atomos products”)
2.End timecode synchronization with the supported Atomos product. (see “Ending pairing with supported Atomos products”)
The unit will start running freely based on the last received timecode data.
NOTE
Free running will use the clock position of this unit.
3.Connect with the DR-10L Pro CONNECT dedicated control app. (see “Connecting with the dedicated control app”)
By following the above procedures, the remote control app can be used with the unit running free using the timecode that it last received.
The input jack of this unit can be used to enable LTC synchronization with a timecode generator.
Received timecode is written to files recorded by this unit in WAV (BWF) format. Using this timecode data simplifies the aligning of video and audio files created by multiple units.
NOTE
If the recording format is set to MP3, timecode cannot be added to recording files.
The LTC frame rates that can be used for synchronization are 23.98F, 24.00F, 25.00F, 29.97ND, 29.97DF, 30.00ND and 30.00DF.
When professional cameras and other devices with frame rates of 50 fps or higher are connected, the frame rate will be halved, for example, by this unit to a usable value. (For example, 50 fps will be received as 25.00F.)
Use a stereo mini cable to connect the LTC output of the timecode generator with the input jack of this unit.
NOTE
If the output level can be switched on the timecode generator, set it to “LTC”.
CAUTION
When a timecode generator is connected, never monitor the LTC signal with earphones or headphones.
The signal input when connected has an extremely high level, so monitoring it has the danger of causing harm to hearing.
13 - 2 Synchronizing with LTC (jam sync)
Use 29: LTC SYNC from the Menu Screen to synchronize with LTC (jam sync).
1.When the Home Screen is open, press the MENU button to open the Menu Screen.
2.Use the [] and [] buttons to select 29: LTC SYNC and press the [ENTER] button.

The unit will receive the LTC signal from the timecode generator and jam sync.


When jam syncing completes, a candidate synchronized frame rate will be shown.

3.Use the [] and [] buttons to select the same frame rate as used by the timecode generator, and press the [ENTER] button.
NOTE
While the DR-10L Pro is synchronised with the timecode, you can disconnect the timecode signal and use the input for recording with a (lavalier) microphone.
After synchronization, timecode will run freely using the precision of the clock in this unit. (The estimated precision is an error of about 1 frame per 24 hours.)
After initialization completes, the ![]() icon will appear on the Home Screen of the unit.
icon will appear on the Home Screen of the unit.
If synchronization is not possible for 30 seconds for some reason, for example because there is no LTC input or the input level is low, an “LTC FAILED” pop-up message will appear. Check the timecode generator settings and connection with this unit. Then, try synchronizing again.
Pressing the MENU button while synchronizing will cancel synchronizing and reopen the Menu Screen. In this case, it will continue with the timecode data from before synchronization.
This cannot be used at the same time as Bluetooth timecode synchronization with an Atomos product. If timecode synchronization was conducted with an Atomos product before LTC synchronization, that timecode data will be discarded and the 25: BLUETOOTH setting will be switched to OFF.
To switch to timecode display on the Home Screen, press and hold the [ENTER] button.
When the power of this unit is turned off, the timecode data used for free running by the unit after synchronization will be discarded. Jam sync again after restarting.
13 - 3 Ending LTC timecode synchronization
Use Menu Screen item 26: TC FORGET to end synchronization with the current timecode.
Setting items (default value underlined)
NO / YES
NO: Return to the Menu Screen.
YES: Initialize the data. After formatting completes, the Menu Screen reappears.
1.When the Home Screen is open, press the MENU button to open the Menu Screen.
2.Use the [] and [] buttons to select 26: TC FORGET, and press the [ENTER] button.
3.Use the [] and [] buttons to select YES, and press the [ENTER] button.
The following is a list of pop-up messages.
|
Message |
Meaning and response |
|
Battery Empty |
The battery is almost out of power. Replace the battery |
|
Card Error |
The microSD card could not be recognized properly. Change the microSD card. |
|
Card Full |
The microSD card has no remaining capacity. Delete or move files to make space available, or replace the card. |
|
File Full |
The total number of recording files exceeded the limit of 1000. Delete or move files to make space available, or replace the card. |
|
File Not Found |
The file was not found or might be damaged. Check the relevant file. Alternatively, the system file is missing. This unit requires a system file for operation. While this message appears, press the |
|
File Protected |
The file is read only and cannot be erased. |
|
Format Error |
The microSD card might not be formatted properly, or it might be broken. This message also appears if the card was formatted using a computer connected by USB or if an unformatted card is inserted in the unit. Always use the unit to format cards to be used with it. Change the microSD card or press the |
|
Invalid Card |
The card might be abnormal. Change the microSD card. |
|
Invalid SysFile |
The system file required to operate this unit is invalid. While this message appears, press the |
|
Max File Size |
The file is larger than the designated size Another possibility is that the recording time has exceeded 24 hours when the total number of folders and files was already at the limit (1000). |
|
MBR Error |
The microSD card might not be formatted properly, or it might be broken. Change the microSD card or press the Formatting will erase all data on the microSD card. |
|
No Card |
No microSD card is in the unit. Insert a recordable microSD card. |
|
No PB File |
There is no file that can be played back on the microSD card. Alternatively, the file might be damaged. |
|
Non-Supported |
The file format is not supported. Please see “Recording/playback formats” for file formats that this unit can use. |
|
Write error |
Writing to the microSD card timed out. This has caused audio to be interrupted and noise to occur. A BOF mark was added at the point when audio was interrupted. Recording continues. Press the |
|
Card slow |
microSD card writing performance has become worse. A BOF mark has been added at the point when audio was interrupted because writing to the microSD card timed out. Check the audio around the BOF mark. Execute the erase format function or change the microSD card. Press the |
|
Can't Save Data |
If any of these errors occurs, turn this unit’s power off and restart it. If the power cannot be turned off, remove the batteries and, if using USB bus power, disconnect the USB cable. If these error messages continue to appear frequently, please contact the store where you purchased this unit or TASCAM customer support service. |
|
Device Error |
|
|
File Error |
|
|
Not Continued |
|
|
Player Error |
|
|
Writing Failed |
|
|
Sys Rom Err |
|
|
System Err -- (-- is a number) |
If you are having trouble with the operation of this unit, please check the following before seeking repair. If these measures do not solve the problem, please contact the store where you bought the unit or TASCAM customer support service.
Power will not turn on
Confirm that batteries are installed correctly.
The unit turns off automatically
Turn off the automatic power off function. To turn it ON/OFF, press the MENU button and use the 15: POWER SAVE item.
The microSD card is not recognized.
Confirm that the microSD card is inserted completely.
Recording is not possible
Confirm that the microSD card has enough open space.
Recording becomes impossible when the total number of files reaches 1000.
The remaining charge of the batteries is not shown accurately
Set the type of battery being used because the remaining battery charge is monitored according to the battery type.
The indicator of the AK-BT1 Bluetooth adapter does not light.
This unit does not have a function that lights the indicator of the AK-BT1 Bluetooth adapter.
microSD card (64 MB − 2 GB)
microSDHC cards (4 GB − 32 GB)
microSDXC cards (64 GB – 512 GB)
|
WAV |
44.1/48kHz, 16/24-bit, mono/poly (BWF format), 32-bit float |
|
MP3 |
44.1/48 kHz, 128/192 kbps (recording) 32 - 320kbps (playback) |
Mic jack
|
Connector |
1/8” (3.5mm) mini TRS jack (with screw lock) |
|
Maximum input level |
−11 dBV |
|
Microphone input gain |
7.5 dB – 38 dB |
|
Input impedance |
2 KΩ or more |
Included mic
|
Microphone sensitivity |
–42 dBV/Pa |
|
Maximum input sound pressure |
115 dB SPL |
Headphones jack
|
Connector |
1/8” (3.5 mm) stereo phone (dual mono audio output) |
|
Maximum output |
10 mW + 10 mW (Distortion 0.1% or less, into 32 Ω load) |
From input to recorded data on SD card
|
Frequency response |
20 Hz – 20 kHz +0/−1 dB |
|
Distortion |
0.01% (1 kHz, at −21 dBV input) |
|
Dynamic range |
105 dB or higher |
2.3 V
2 AAA batteries (alkaline, NiMH or lithium-ion rechargeable) (sold separately)
USB bus power from a computer
Power consumption (batteries)
0.3 W (maximum)
Current consumption (USB bus power)
0.1 A (maximum)
Battery operation time (continuous operation)
Using an alkaline battery (EVOLTA)
|
Conditions |
Operation time |
Note |
|
|
Recording |
No Bluetooth connection |
About 16.5 hours |
Format: WAV, 48 kHz, 32-bit float Mic connected Headphones not connected Limiter: off File type: mono |
|
With Bluetooth connection |
About 16 hours |
Using NiMH battery (eneloop)
|
Conditions |
Operation time |
Note |
|
|
Recording |
No Bluetooth connection |
About 11.5 hours |
Format: WAV, 48 kHz, 32-bit float Mic connected Headphones not connected Limiter: off File type: mono |
|
With Bluetooth connection |
About 10.5 hours |
Using lithium battery (Energizer ULTIMATE LITHIUM)
|
Conditions |
Operation time |
Note |
|
|
Recording |
No Bluetooth connection |
About 24.5 hours |
Format: WAV, 48 kHz, 32-bit float Mic connected Headphones not connected Limiter: off File type: mono |
|
With Bluetooth connection |
About 23 hours |
NOTE
Measurement conditions were in accordance with JEITA CP-2905.
The continuous battery operation times may vary from the values shown depending on the recording media being used.
When using device with a headphone connected,the battery life will be reduced.
Recording times when using microSD cards
The following table shows recording times for microSD cards with different capacities.
|
Recording format |
Card capacity |
||
|
8GB |
32GB |
||
|
16-bit mono WAV |
44.1 kHz |
25:10 |
100:46 |
|
48 kHz |
23:08 |
92:34 |
|
|
24-bit mono WAV |
44.1 kHz |
16:46 |
67:10 |
|
48 kHz |
15:24 |
61:42 |
|
|
32-bit float mono WAV |
44.1 kHz |
12:34 |
50:22 |
|
48 kHz |
11:34 |
46:16 |
|
The recording times shown above are estimates. They might differ depending on the microSD card in use.
The recording times shown above are not continuous recording times, but rather they are the total possible recording times for the microSD card.
If recorded using the POLY (stereo) setting, maximum recording times will be about half those above.
Date and time data retention
Secondary lithium battery ×1 (built-in)
Dimensions
53 x 50.7 x 21.4 mm (width × height × depth, excluding protrusions)
Weight
43 g (not including batteries)
65 g (including batteries)
Operating temperature range
0 – 40ºC
Illustrations in this manual might differ in part from the actual product.
Specifications and external appearance might be changed without notification to improve the product.
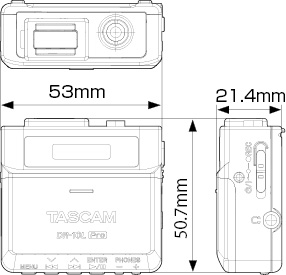
|
0425.MA-3640B |