|
|
D01419920A |


OWNER'S MANUAL
V1.0.0
|
|
D01419920A |
OWNER'S MANUAL
V1.0.0
DR-10L Pro CONNECT is an app for wireless control of DR-10L Pro units.
With this app, smartphones and tablets can be used to monitor and control DR-10L Pro units that are attached to recording subjects.
Up to 5* DR-10L Pro units can be connected simultaneously. In addition to being operated independently, recording can be started and stopped for all connected units at the same time.
 Units can be easily set, controlled and monitored using a straightforward graphical interface on smartphones and tablets.
Up to 5 DR-10L Pro units can be monitored and their recording can be started and stopped at the same time.
Input sounds can be monitored visually using waveform displays.
Multiple units can be given individual names and colors for easier management.
Metadata (project names, scene names and take numbers) can be recorded as iXML data. This makes editing tasks more efficient.
Unit preset data can be saved in the app. Favorite unit settings can be recalled in an instant.
Unit clocks are automatically synchronized with time data from the smartphone or tablet. Setting the time manually is unnecessary.
*The number of recorders that can be connected could vary depending on the surrounding environment and radio wave conditions.
|
This app includes a demo mode allowing it to be tested even without a DR-10L Pro unit. Using DR-10L Pro CONNECT in demo mode allows users to check how it is operated and the settings that can be made. See “Using demo mode” for details about demo mode. |
|
Before using this app, read the Software Use License Agreement and agree to its terms. |
Check the TEAC Global Site (https://teac-global.com/) for the latest information about supported operating systems.
Operation with each OS was confirmed with standard system setups that met the following conditions. Operation is not guaranteed, however, with all systems that meet the following conditions.
iOS 16/iPadOS 16
iOS 15/iPadOS 15
iOS 14/iPadOS 14
Android 13
Android 12
Android 11
1 - 3 Conventions used in this manual
The following conventions are used in this manual.
DR-10L Pro CONNECT is called “this app”.
References to “iOS” in this document also include “iPad OS”.
Messages that appear on devices are shown in quotes like this: “OK”.
As necessary, additional information is provided under TIP, NOTE and CAUTION headings.
TIP
These are tips about how to use it.
NOTE
These provide additional explanations and describe special cases.
CAUTION
Failure to follow these instructions could result in damage to equipment or lost data, for example.
 CAUTION
Failure to follow these instructions could result in injury.
TASCAM is a registered trademark of TEAC Corporation.
The Bluetooth® word mark and logo are the property of Bluetooth SIG, Inc. and are used by TEAC Corporation with permission.
Android and Google Play are trademarks of Google Inc.
Apple, Mac, macOS, iPad and the App Store are trademarks of Apple Inc. in the U.S. and other countries. The iPhone trademark is used under license from Aiphone Co., Ltd.
App Store is a service mark of Apple Inc.
IOS is a trademark or registered trademark of Cisco Systems, Inc. in the U.S. and other countries and is used under license.
Other company names, product names and logos in this document are the trademarks or registered trademarks of their respective owners.
An iOS/Android device (smartphone or tablet) that supports Bluetooth device connection functions and a DR-10L Pro with an AK-BT1 Bluetooth adapter installed are necessary to use this app.
TIP
This app includes a demo mode allowing it to be tested even without a DR-10L Pro unit.
This app can be used in demo mode to check how it is operated and the settings that can be made.
See “Using demo mode” for details about demo mode.
NOTE
Referring to “Installing an AK-BT1 Bluetooth adapter” in the DR-10L Pro Owner’s Manual, install the AK-BT1 Bluetooth adapter beforehand.
2 - 1 Enabling the remote control function on a DR-10L Pro unit
Turn on the remote control function on the DR-10L Pro unit.
Use the Menu Screen 25: BLUETOOTH item to set the remote control function
1.When the Home Screen is open, press the MENU button.
The Menu Screen will open.

2.Use the  [
[ ] and
] and  [
[ ] buttons to select 25: BLUETOOTH, and press the

 [ENTER] button.

3.Use the [] and [] buttons to select REMOTE, and press the [ENTER] button.

NOTE
See the DR-10L Pro Owner’s Manual for details about operation procedures.
2 - 2 Installing the dedicated control app
1.Connect the smartphone or tablet device to the Internet.
2.Search for “DR-10L Pro CONNECT” on Google Play for an Android device or on the App Store for an iOS device. Then, download and install it.
NOTE
Please be aware that you are responsible for any transmission costs related to Internet connection.
Refer to the operation manual of the device being used for procedures.
2 - 3 Enabling the Bluetooth function on smartphones/tablets
Enable the Bluetooth function on the smartphone or tablet.
CAUTION
Do not execute pairing from the Bluetooth device list screen of the smartphone/tablet. If pairing has been conducted, remove the pairing.
Always launch this app and then connect.
When using an Android device, set Location to “On”, and set “Location permission” for this app to “Allow” or “Allow only while in use”.
NOTE
Refer to the operation manual of the device being used for procedures.
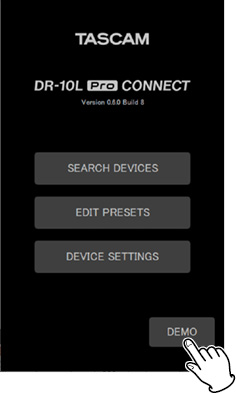
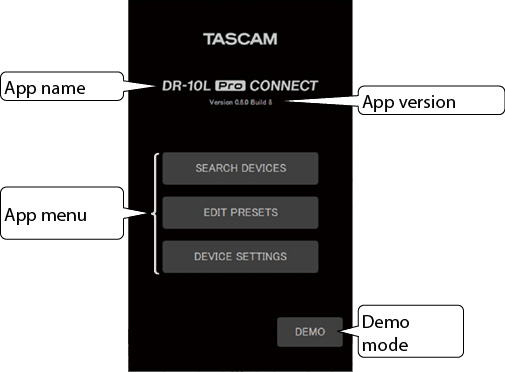
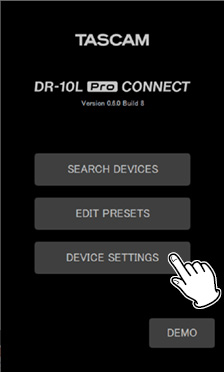
Use the smartphone or tablet to launch this app.

The following screen will appear after the app starts up.
3 - 1 Connecting to a DR-10L Pro
1.Tap “SEARCH DEVICES” on the opening screen.

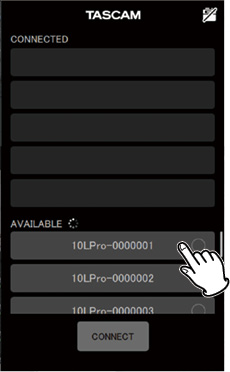
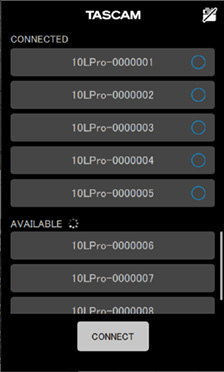
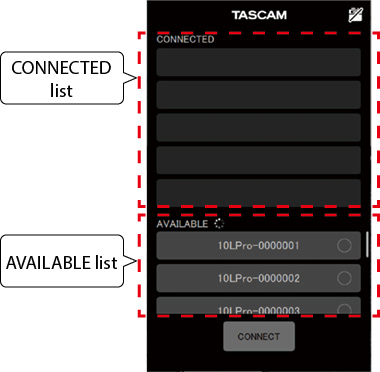
The following screen will appear.
|
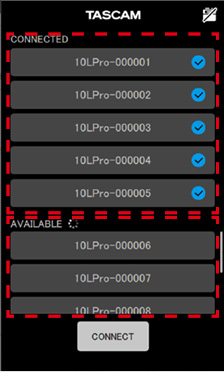
CONNECTED list |
This shows the names of devices that are connected or in connection standby. |
|
AVAILABLE list |
If devices that can be connected are available, this shows their names. |
NOTE
The device name is shown as the UNIT NAME set in this app. The BLUETOOTH ID will be shown the first time that this app is launched or if a UNIT NAME has not been set.
The BLUETOOTH ID can be checked on the DR-10L Pro using the 26: BT ID item of the Menu Screen.
See “Setting the UNIT NAME” for UNIT NAME setting procedures.
Since the app remembers the CONNECTED list, the previous state will be shown the next time it is launched.
Devices that have been set in DEVICE SETTINGS will always be shown in the AVAILABLE list.
New devices cannot be found if device data for 99 units has already been added. Device data can be removed from the DEVICE SETTINGS Screen to enable finding new devices. See “Removing device data” for how to remove devices.
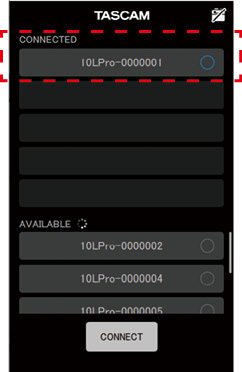
2.Tap the desired device in the AVAILABLE list to connect it.
|
|
|
|
It will be added to the CONNECTED list.
NOTE
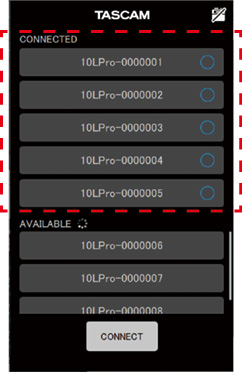
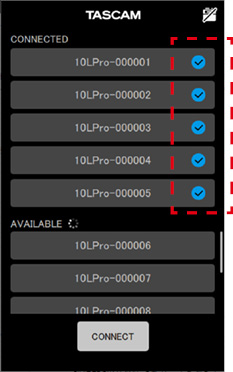
Up to 5 devices can be added to the CONNECTED list.
|
|
|
Example with 5 DR-10L Pro units added to the CONNECTED list |
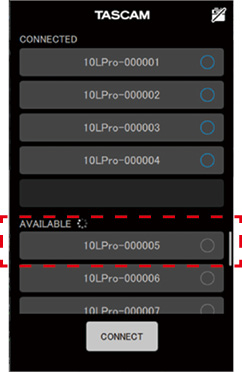
Tap a device shown in the CONNECTED list to move it to the AVAILABLE list.
|
|
|
|
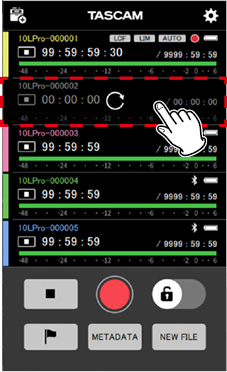
When a device is added to the CONNECTED list, it will begin connection standby and connection will automatically be attempted.
|
|
|
|
A check will appear when connection completes.
NOTE
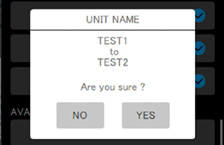
After connection completes, the UNIT NAME set in the app will be registered in the DR-10L Pro.
If a different UNIT NAME is already saved on the DR-10L Pro, a confirmation pop-up message will appear.
|
|
|
Example when the UNIT NAME in the app is “TEST1” and the UNIT NAME on the DR-10L Pro unit is “TEST2” |
|
NO |
Set the app UNIT NAME (“TEST1”) as the unit name on the DR-10L Pro unit. |
|
YES |
Set the DR-10L Pro UNIT NAME (“TEST2”) as the unit name in the app. |
If a UNIT NAME has been set on the DR-10L Pro unit but not in the app, the UNIT NAME set on the unit will be added to the app settings.
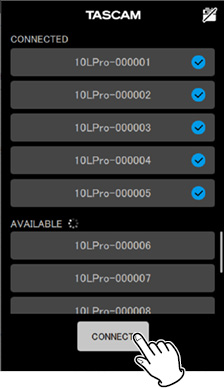
3.Tap the  button.
|
|
|
|
The Home Screen will appear.
In demo mode, this app can be tried without a DR-10L Pro unit.
In demo mode, the CONNECTED and AVAILABLE lists, which would appear with the SEARCH DEVICES function, will be shown with pre-prepared virtual devices that can be connected.
NOTE
When used in demo mode, DR-10L Pro unit settings will not be changed.
Items and presets on the APP SETTINGS Screen (see “APP SETTINGS Screen”) can be edited in demo mode.
1.Tap “DEMO” on the opening screen.
|
|
|
|
Virtual DR-10L Pro units that can be connected will be shown in the CONNECTED and AVAILABLE lists.
NOTE
In demo mode, after 5 DR-10L Pro units have been connected, they will be shown in the CONNECTED list.
Tap a DR-10L Pro shown in the CONNECTED list to move it to the AVAILABLE list.
2.Tap the button.
|
|
|
|
The Home Screen will appear.
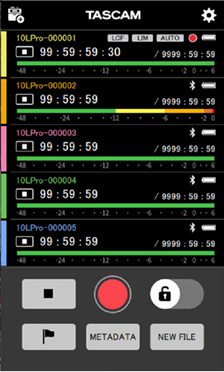
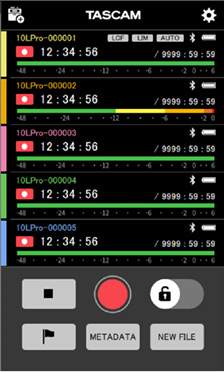
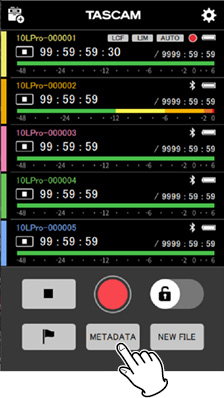
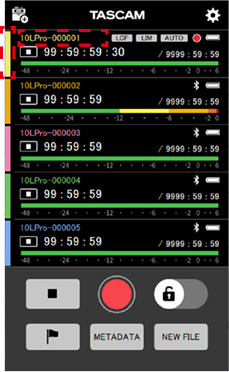
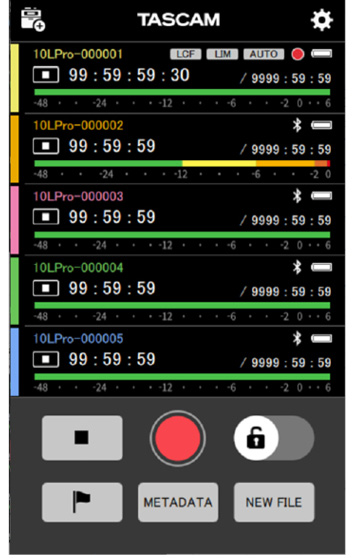
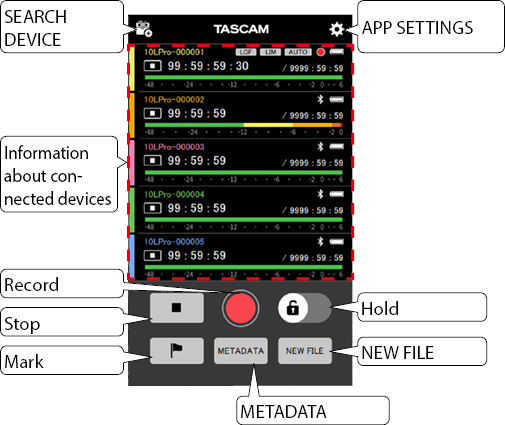
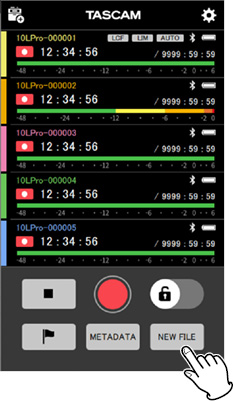
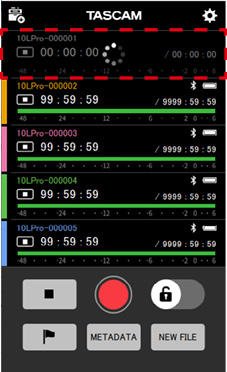
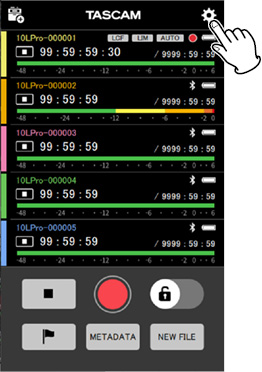
All connected DR-10L Pro units can be operated from the Home Screen.
|
SEARCH DEVICE |
This opens the Device Selection Screen. |
|
APP SETTINGS |
This opens the APP SETTINGS Screen. |
|
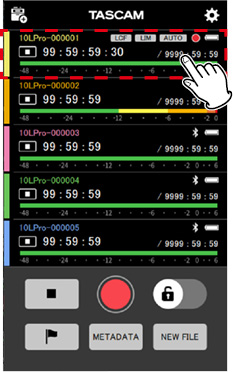
Information about units |
This shows information about the connected DR-10L Pro units (up to 5). Tap these areas to open screens for the individual units. |
|
|
Start recording with every connected unit. |
|
|
Stop recording with every connected unit. |
|
|
Add marks with every connected unit. |
|
|
Press and hold this to turn on/off the hold function, which disables app operations. This is independent from the hold functions of the individual hardware units. |
|
|
Press this when recording to start recording a new file. |
|
|
This opens a screen where iXML data for all the connected units can be edited. |
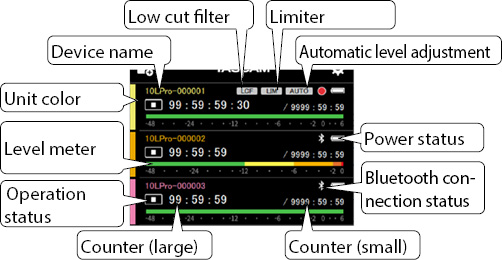
Information about units on the Home Screen
This shows information about the connected DR-10L Pro units (up to 5).
|
Device name |
This shows the name of the DR-10L Pro. If UNIT NAME* is set, it will be shown as the device name. Characters will be shown using the color** set for the unit set. |
|
Unit color |
This shows the color** set for the DR-10L Pro. |
|
Level meter |
When set to 16/24-bit: up to 0 dB shown When set to 32-bit float: up to +6 dB shown This will appear red during analog clipping. |
|
Operation status |
This shows the operation status of the unit.
|
|
Counter (large) |
When stopped: This shows the total file time When recording/playing back: This shows the elapsed time When operating with timecode, this always shows timecode. |
|
Counter (small) |
When stopped/recording: This shows the remaining card capacity When playing back: This shows the total file time |
|
Low cut filter |
|
|
Limiter |
|
|
Automatic level adjustment |
|
|
Power status |
This shows the status of the power supply.
|
|
Bluetooth connection status |
|
* The UNIT NAME is set on the DEVICE SETTINGS Screen of the individual unit. (see “DEVICE SETTINGS Screen”)
** The unit color is set on the DEVICE SETTINGS Screen of the individual unit. (see “DEVICE SETTINGS Screen”)
Tap an individual unit to open its screen.
|
|
|
|
|
Home Screen |
Individual unit screen |
See “Individual unit screens” for details about individual unit screens.
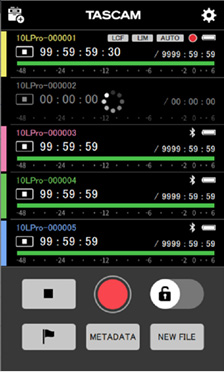
Appearance while connecting
When connection interrupted
A device will appear gray when it is connecting or when its connection has been interrupted.
Tap a device shown with a ![]() mark to try reconnecting it.
mark to try reconnecting it.
|
|
|
|
|
The 2nd DR-10L Pro appears gray |
Connecting |
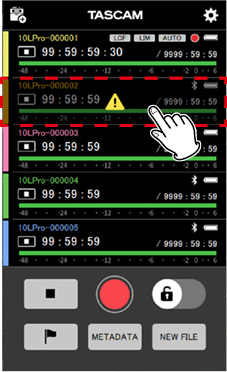
Warning indicators
A ![]() will appear if trouble occurs when connecting with a device. Tap a device shown with a
will appear if trouble occurs when connecting with a device. Tap a device shown with a ![]() to open a pop-up message.
to open a pop-up message.
|
|
|
|
|
A |
Pop-up message |
The pop-up window will be shown for about 2 seconds.
Error indicators
A ![]() will appear if an error occurs when connecting with a device. Tap a device shown with a
will appear if an error occurs when connecting with a device. Tap a device shown with a ![]() to open a pop-up message.
to open a pop-up message.
|
|
|
|
|
A |
Pop-up message |
See the message list in the DR-10L Pro Owner’s Manual for details about pop-up messages and respond accordingly.
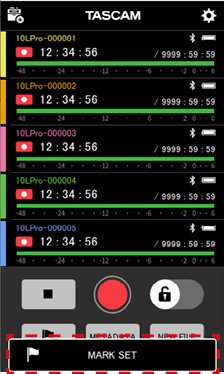
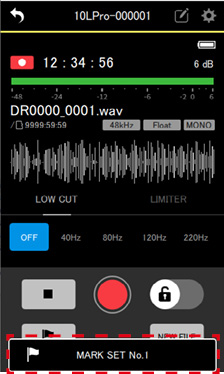
Appearance when setting marks
Tapping the  button will open a MARK SET pop up from the bottom of the screen. The pop-up will close after about 2 seconds.
|
|
|
|
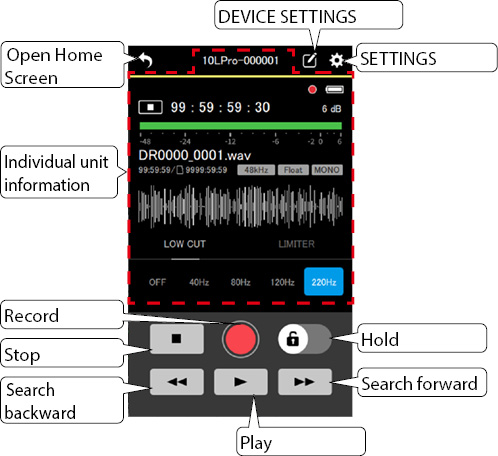
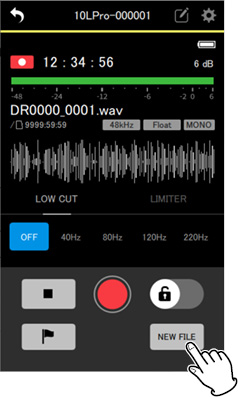
On individual unit screens, only the unit shown can be operated.
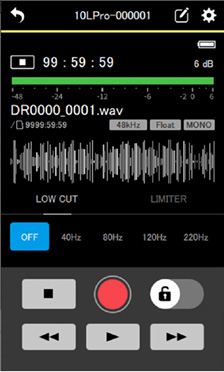
Structure of individual unit screens
|
Open Home Screen |
This opens the Home Screen. |
|
DEVICE SETTINGS |
This opens a screen for setting the unit name and color of the DR-10L Pro being shown. |
|
SETTINGS |
This opens a screen for making recording, input and system settings for the unit being shown. |
|
Individual unit information |
This shows the status of the unit being shown. |
|
|
This starts recording with the unit being shown. |
|
|
This stops recording with the unit being shown. |
|
|
Press and hold this to turn on/off the hold function, which disables app operations. This is independent from the hold functions of hardware units. |
|
|
This starts searching forward with the unit being shown. |
|
|
This starts searching backward with the unit being shown. |
|
|
This starts playback with the unit being shown. |
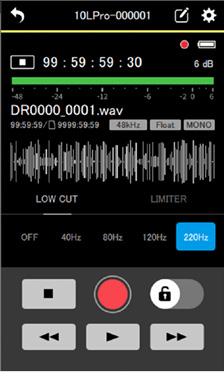
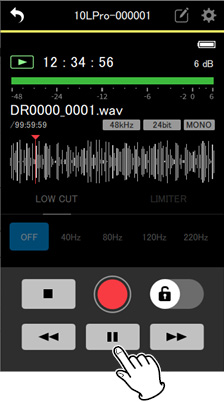
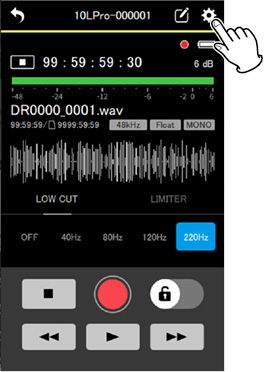
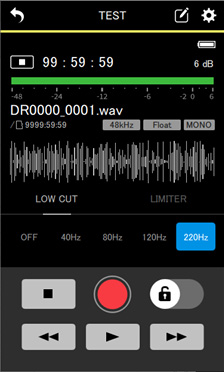
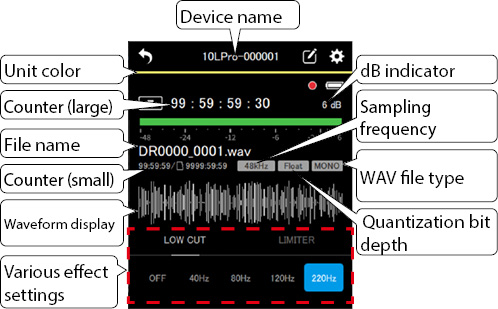
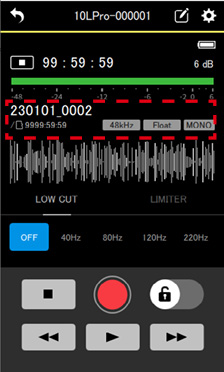
Information about the unit on the individual unit screen
|
Device name |
This shows the device name If UNIT NAME* is set, it will be shown as the device name. |
|
Unit color |
This shows the color** set for the unit. |
|
Counter (large) |
When stopped: This shows the total file time When recording/playing back: This shows the elapsed time When operating with timecode, this always shows timecode. |
|
File name |
This shows the name of the file being recorded or played. |
|
Counter (small) |
When stopped/recording: This shows the remaining card capacity When playing back: This shows the total file time In addition to the above, the following will also be shown when operating with timecode. When stopped: This shows the total file time When recording/playing back: This shows the elapsed time |
|
Waveform display*** |
The waveform is shown in real time when stopped or recording. The waveform of the entire file is shown when playing or paused. The waveform can be touched to locate to a playback position. |
|
Various effect settings |
Various effects settings can be shown and changed. Operation is not possible during playback. |
|
dB indicator |
This shows the dB during recording/playback. |
|
Sampling frequency |
This shows the sampling frequency of the file being played/recorded.
|
|
WAV file type |
This shows the type of WAV file being played/recorded.
|
|
Quantization bit depth |
This shows the quantization bit depth of the file being played/recorded.
|
* The UNIT NAME is set on the DEVICE SETTINGS Screen of the individual unit. (see “DEVICE SETTINGS Screen”)
** The unit color is set on the DEVICE SETTINGS Screen of the individual unit. (see “DEVICE SETTINGS Screen”)
*** Waveforms cannot be shown for imported files.
This app can be used to control recording operations for all connected DR-10L Pro units at once and for individual units.
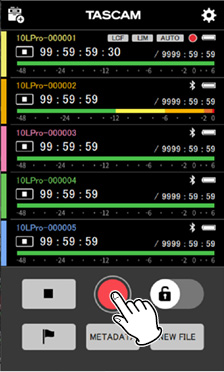
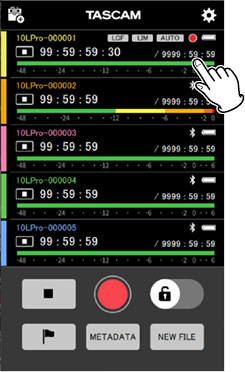
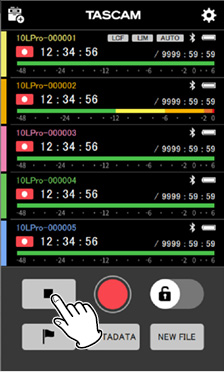
Recording with all units together
Tap the  button on the Home Screen.
|
|
|
|
This starts recording with all units.
Tap the  button to stop all units together.
NOTE
Units that are not connected cannot be controlled.
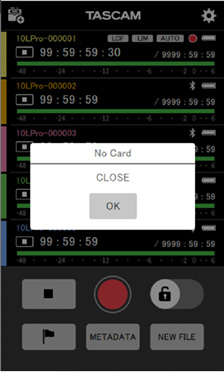
A ![]() will appear if trouble occurs with a device, and a
will appear if trouble occurs with a device, and a ![]() will appear if an error occurs with a device. Tap a unit that is showing a trouble or error icon to open a pop-up message with details.
will appear if an error occurs with a device. Tap a unit that is showing a trouble or error icon to open a pop-up message with details.
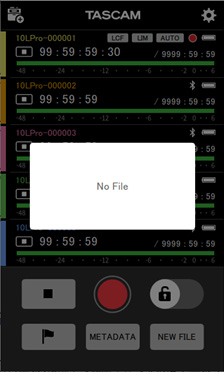
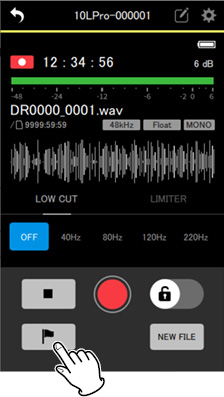
Tap the button during recording to add mark data to the recording file.
|
|
|
|
Tap the  button when recording to start recording in a new file.
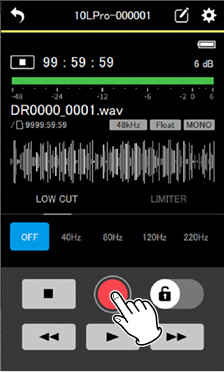
Recording with individual units
1.Tap the unit to use for recording on the Home Screen.
|
|
|
|
This will open the screen for the individual unit.
2.Tap the button on the individual unit screen.
|
|
|
|
This starts recording with the unit being shown.
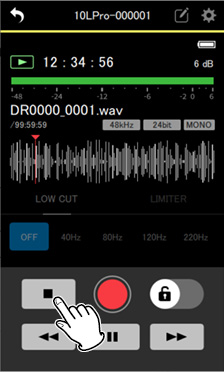
Tap the button to stop recording.

NOTE
Tap the button during recording to add mark data to the recording file.
|
|
|
|
Tap the button when recording to start recording in a new file.
This app can control playback operations only for individual units.
1.Tap the unit to use for playback on the Home Screen.
|
|
|
|
This will open the screen for the individual unit.
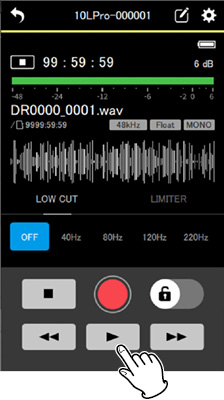
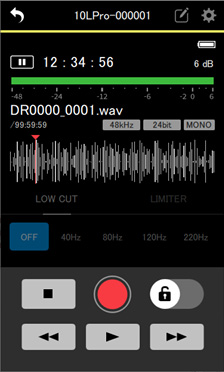
2.Tap the  button on the individual unit screen being shown.
|
|
|
|
This starts playback on the unit being shown.
NOTE
If you want to conduct playback on another connected unit, return to the Home Screen after step 2, select the other unit and repeat from step 1.
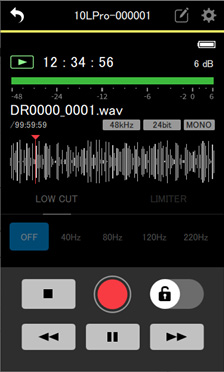
During playback, the button changes to the  button.
Tap the button to pause playback.
|
|
|
|
Tap the button to stop playback.
|
|
|
|
TIP
Press and hold the  /
/  button to search backward/forward.
Tap the button to open the next file.
Tap the button to conduct the following operations.
Move to the beginning of the file if the playback position is in the middle of a file.
Move to the previous file if the playback position is at the beginning of a file.
NOTE
The playback position shown on the waveform can be swiped to move it to the desired point.
Waveforms cannot be shown for imported files.
To select a file for playback, use the BROWSE Screen (see “BROWSE Screen”).
Setting screens cannot be operated during playback.
Open the APP SETTINGS from the Home Screen to change app settings.
Tap the ![]() icon at the top right of the Home Screen.
icon at the top right of the Home Screen.
|
|
|
|
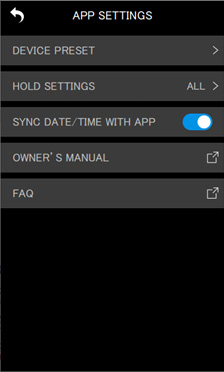
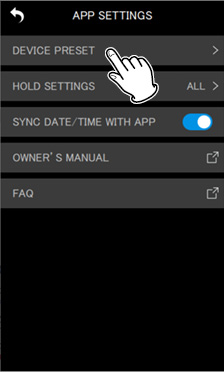
This opens the APP SETTINGS Screen.
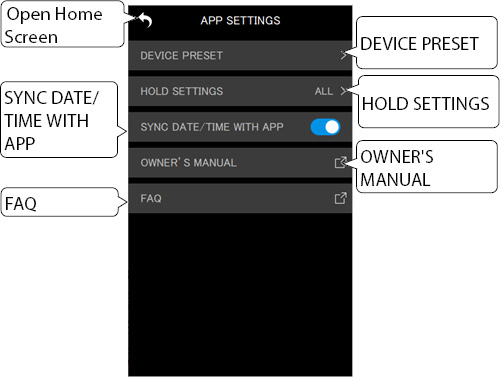
DEVICE PRESET
This opens the PRESET LIBRARY Screen where presets can be edited and recalled.
By recalling presets that have been edited, settings can be applied to any unit.
|
|
|
|
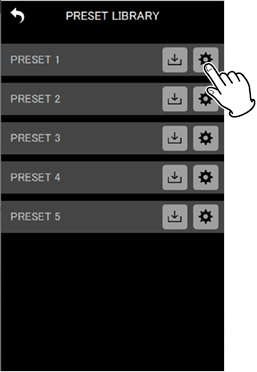
Editing presets
Tap the ![]() icon to the right of the preset you want to edit.
icon to the right of the preset you want to edit.
|
|
|
|
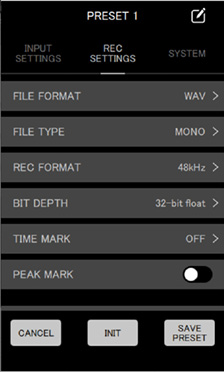
This will open the preset editing screen.
See “Editing presets” for details about how to edit presets.
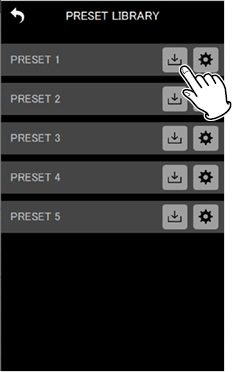
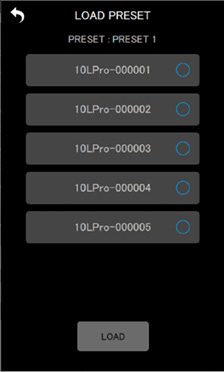
Loading presets
Tap the ![]() icon to the right of the preset you want to load.
icon to the right of the preset you want to load.
|
|
|
|
This will open the LOAD PRESET Screen.
See “Loading presets” for details about how to load presets.
HOLD SETTINGS
By setting the HOLD function, recording and playback misoperation can be prevented while monitoring and changing settings for each unit.
See “Setting the HOLD function” for details.
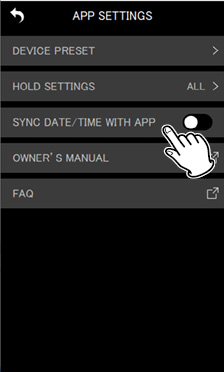
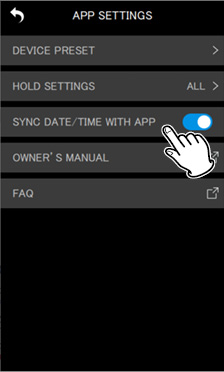
SYNC DATE/TIME WITH APP
By enabling this automatic time synchronization function, time data from the device can be applied to DR-10L Pro units (on by default).
See “Synchronizing the time” for details.
OWNER'S MANUAL
This will open an external link with the DR-10L Pro Owner’s Manual.
The manual will be shown at the external link.*
FAQ
This will open an external link with a DR-10L Pro FAQ.
The FAQ will be shown at the external link.*
* The external link will be opened in the web browser designated by the device.
The settings of connected DR-10L Pro units can be changed from this app. No operation is necessary on the DR-10L Pro units.
Settings can be changed on the DEVICE SETTINGS and SETTINGS screens for individual units.
DEVICE SETTINGS
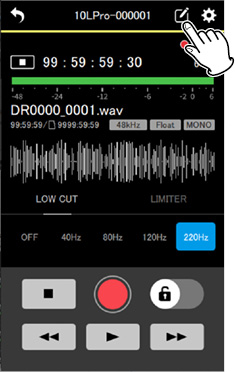
Tap the ![]() icon at the top right of the Home Screen.
icon at the top right of the Home Screen.
|
|
|
|
This opens the DEVICE SETTINGS Screen. (see “DEVICE SETTINGS Screen”)
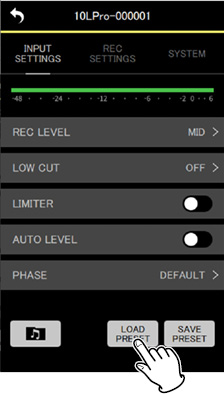
SETTINGS
Tap the ![]() icon at the top right of the Home Screen.
icon at the top right of the Home Screen.
|
|
|
|
This opens the SETTINGS Screen. (see “SETTINGS Screen”)
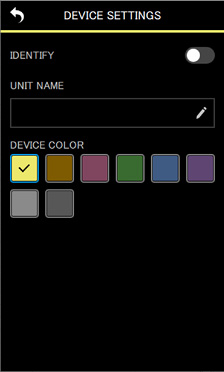
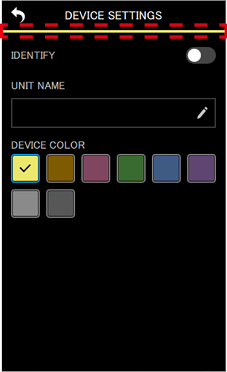
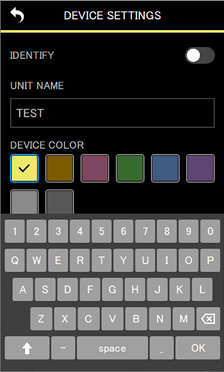
On the DEVICE SETTINGS Screen, the UNIT NAME and DEVICE COLOR can be set for the device shown. That device can also be identified by making its display blink.
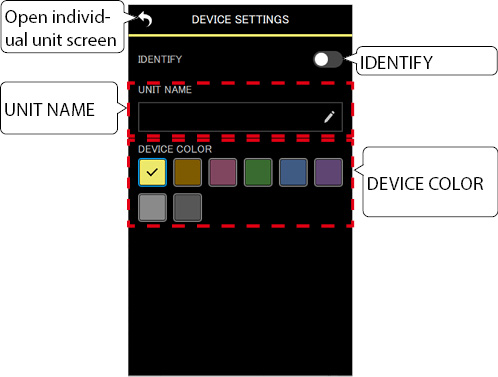
IDENTIFY
This causes the DR-10L Pro unit display to blink, enabling confirmation of the unit being controlled.
See “Identifying the unit being controlled” for details.
The UNIT NAME can be set to give the unit the desired name.
TIP
When recording a TV drama or play, for example, setting UNIT NAME to the individual names of each performer can make identification easier when managing files and editing.
See “Setting the UNIT NAME” for details.
DEVICE COLOR
Colors can be selected and set for each unit.
The DEVICE COLOR is used for various device indications on the Home Screen and the individual unit screen.
See “Setting the DEVICE COLOR” for details.
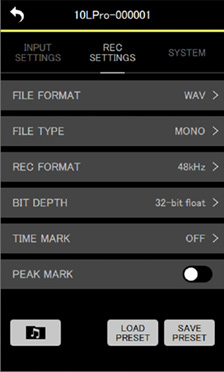
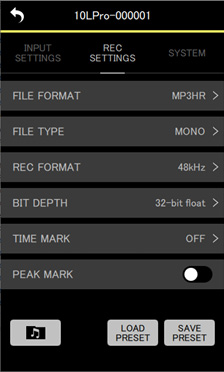
On the SETTINGS Screen, input, recording and system settings can be changed.
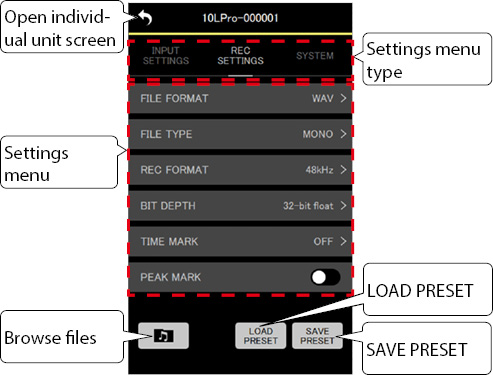
|
Settings menu type |
Tap a type of settings menu to show the corresponding settings. The title of the menu being shown will have white characters and a white underline. |
|
Settings menu |
Setting items are shown for the open settings menu type. |
|
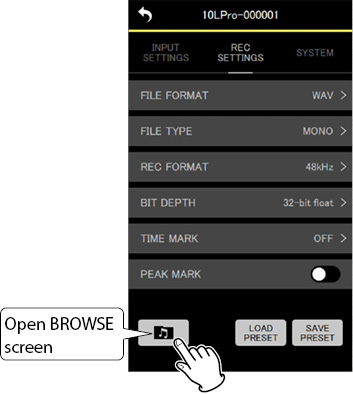
|
This opens the BROWSE Screen. (see “BROWSE Screen”) Operations can be conducted for the files on the unit being shown. |
|
|
Presets can be loaded onto the unit being shown. |
|
|
The settings of the unit being shown can be saved as a preset. |
NOTE
On the SETTINGS Screen, presets can be recalled and applied to the settings of the unit being shown. In addition, the current settings can be saved as a preset.
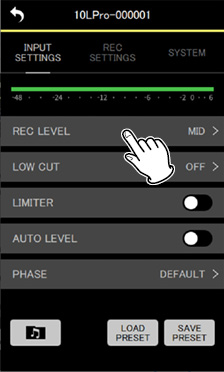
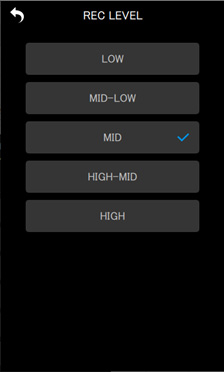
REC LEVEL
Use to set the audio signal level recorded in recording files.
Setting options (default value underlined)
HIGH / HIGH-MID / MID / MID-LOW / LOW
1.Tap the setting menu item.
|
|
|
|
The setting options screen will open.
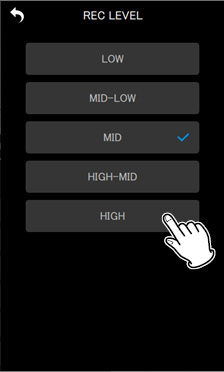
2.Tap a setting option.
|
|
|
|
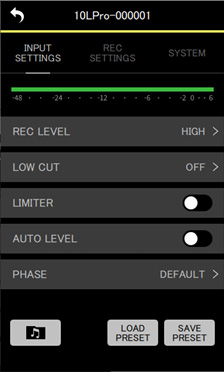
The change will be applied and the INPUT SETTINGS menu screen will reopen.
Change the setting so that the level meter exceeds the center slightly.
NOTE
If the AUTO LEVEL item is set to ON, it will be reset to OFF if the REC LEVEL setting is changed.
When this happens, “AUTO LVL Cancel” will appear in a pop-up message.
To use the auto level function, after setting the REC LEVEL item, set the AUTO LEVEL item to ON again.
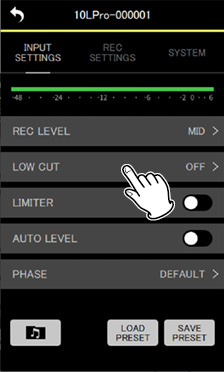
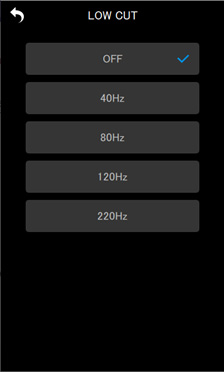
LOW CUT
The cutoff frequency of the low-cut filter used on the mic input can be set.
This cuts audio below the selected frequency.
The low-cut filter can reduce bothersome noise, such as from wind, air-conditioners and projectors.
Set the cutoff frequency of the low-cut filter to match the noise.
Setting options (default value underlined)
OFF / 40Hz / 80Hz / 120Hz / 220Hz
1.Tap the setting menu item.
|
|
|
|
The setting options screen will open.
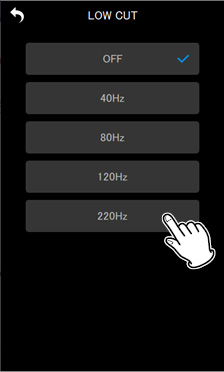
2.Tap a setting option.
|
|
|
|
The change will be applied and the INPUT SETTINGS menu screen will reopen.
NOTE
LOW CUT can also be set in the effects settings on individual unit screens (see “Individual unit screens”).
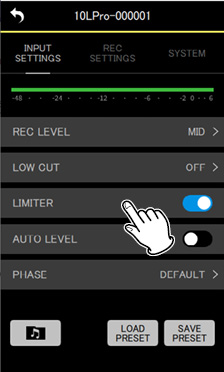
LIMITER
The limiter prevents distortion when signals that are too loud are input suddenly.
Setting options (default value underlined)
OFF / ON
Tap this to turn it on/off.
|
|
|
|
NOTE
Distortion of sounds may occur when signals that are very loud are input even if the LIMITER function is activated. In such a case, change the REC LEVEL item setting to lower the recording level or increase the distance of the mic from the sound source.
LIMITER can also be set in the effects settings on individual unit screens (see “Individual unit screens”).
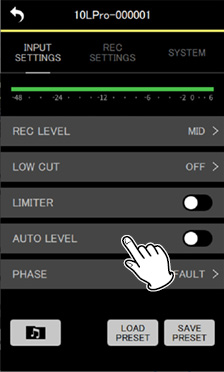
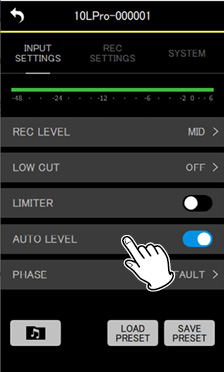
AUTO LEVEL
When the input sound level is too low or too high, this function can automatically increase or decrease the recording level to an appropriate level.
Setting options (default value underlined)
OFF / ON
Tap this to turn it on/off.
|
|
|
|
NOTE
If the AUTO LEVEL item is set to ON, it will be reset to OFF if the REC LEVEL setting is changed.
When this happens, “AUTO LVL Cancel” will appear in a pop-up message.
To use the auto level function, after setting the REC LEVEL item, set the AUTO LEVEL item to ON again.
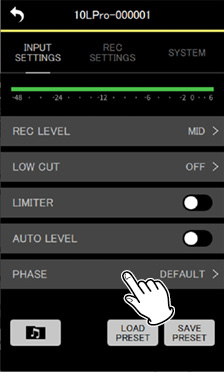
PHASE
Some mics output positive signals and others output negative signals. Set this according to the connected mic type.
Setting options (default value underlined)
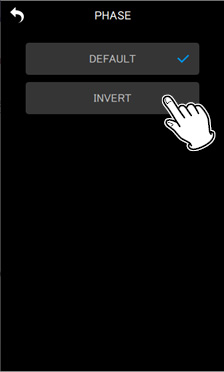
DEFAULT / INVERT
DEFAULT: Record as a positive signal when positive sound pressure is input using the included mic.
INVERT: Record as a negative signal (signal with phase inverted) when positive sound pressure is input using the included mic.
1.Tap the setting menu item.
|
|
|
|
The setting options screen will open.
2.Tap a setting option.
|
|
|
|
The change will be applied and the INPUT SETTINGS menu screen will reopen.
NOTE
The mic included with the DR-10L Pro is a type that outputs negative signals. The DEFAULT setting records as a positive signal.
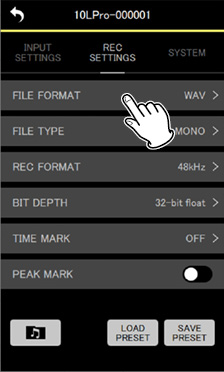
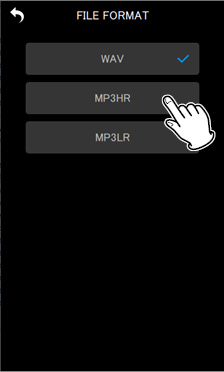
FILE FORMAT
This sets the recording file format
Setting options (default value underlined)
WAV / MP3HR / MP3LR
WAV: WAV format will be used for recording files.
MP3HR: 192kbps MP3 format will be used for recording files.
MP3LR: 128kbps MP3 format will be used for recording files.
1.Tap the setting menu item.
|
|
|
|
The setting options screen will open.
2.Tap a setting option.
|
|
|
|
The change will be applied and the REC SETTINGS menu screen will reopen.
NOTE
The 44.1kHz/48kHz sampling frequency and MONO (mono)/POLY (stereo) recording file type settings will be applied to files recorded in MP3 format. When POLY (stereo), the same data will be recorded on the left and right channels.
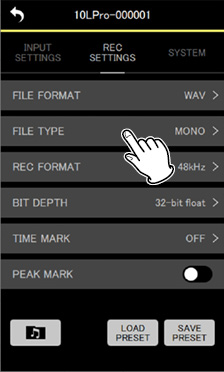
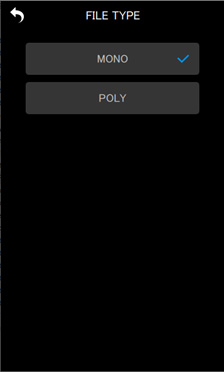
FILE TYPE
The type of WAV recording file can be set.
Setting options (default value underlined)
MONO / POLY
MONO: Files will be handled as mono files.
POLY: Files will be handled as stereo files. (The same data will be on left and right channels.)
1.Tap the setting menu item.
|
|
|
|
The setting options screen will open.
2.Tap a setting option.
|
|
|
|
The change will be applied and the REC SETTINGS menu screen will reopen.
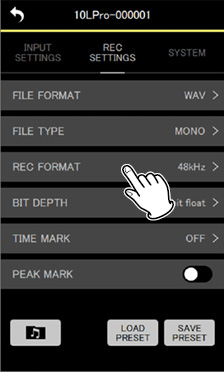
REC FORMAT
The sampling frequency used for recording can be set.
Setting options (default value underlined)
44.1kHz / 48kHz
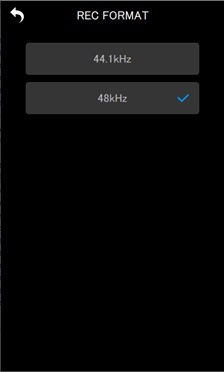
1.Tap the setting menu item.
|
|
|
|
The setting options screen will open.
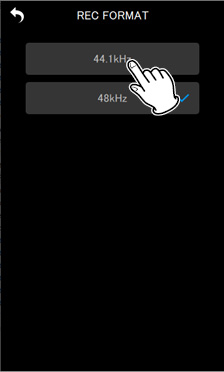
2.Tap a setting option.
|
|
|
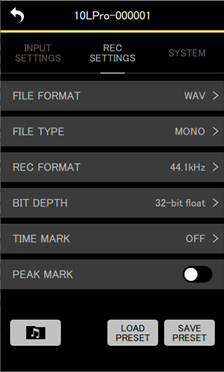
|
The change will be applied and the REC SETTINGS menu screen will reopen.
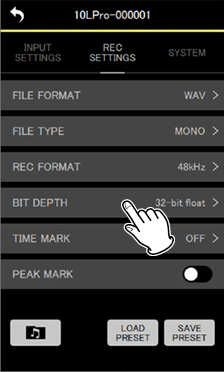
BIT DEPTH
The quantization bit depth used when recording can be set.
Setting options (default value underlined)
16bit / 24bit / 32-bit float
|
32-bit float The DR-10L Pro supports 32-bit float recording. Files recorded using 32-bit float have the following advantages when being edited afterward.
CAUTION Analog clipping will not be changed when volume is lowered. |
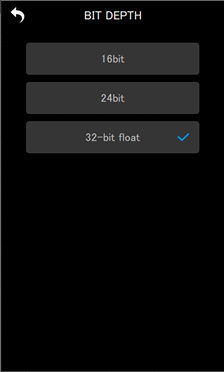
1.Tap the setting menu item.
|
|
|
|
The setting options screen will open.
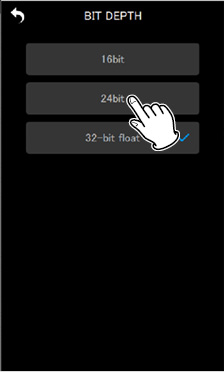
2.Tap a setting option.
|
|
|
|
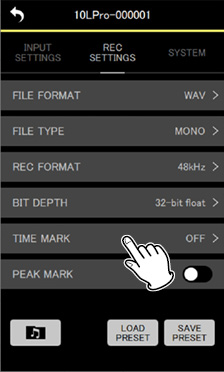
The change will be applied and the REC SETTINGS menu screen will reopen.
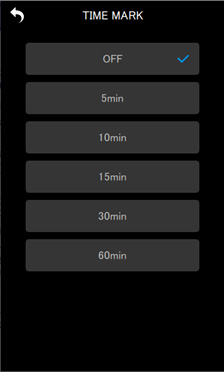
TIME MARK
The time that marks are added automatically when a set recording time elapses can be set.
Setting options (default value underlined)
OFF / 5min / 10min / 15min / 30min / 60min
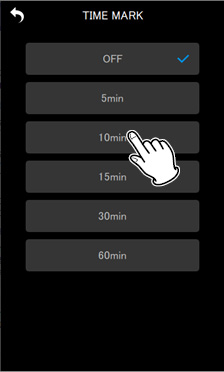
1.Tap the setting menu item.
|
|
|
|
The setting options screen will open.
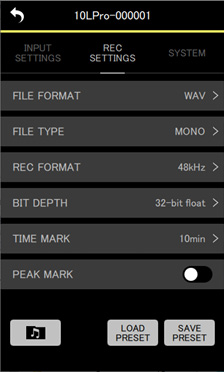
2.Tap a setting option.
|
|
|
|
The change will be applied and the REC SETTINGS menu screen will reopen.
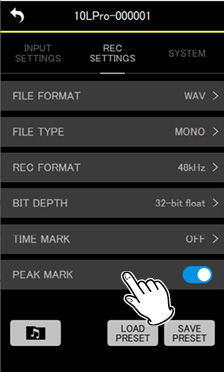
PEAK MARK
Marks can be added automatically when input signals exceed the peak level during recording.
This can be used after recording to find parts where the peak level was exceeded.
Setting options (default value underlined)
OFF / ON
Tap this to turn it on/off.
|
|
|
|
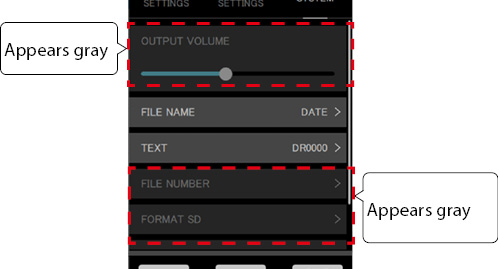
OUTPUT VOLUME
Use these to adjust the volume output from the headphone jack on the DR-10L Pro.
The volume shows the value set on the unit.
Minimum value: 0
Maximum value: 30
Move the slider left and right to change the setting.
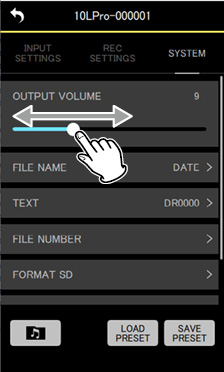
NOTE
The volume is also shown on the display of the DR-10L Pro.
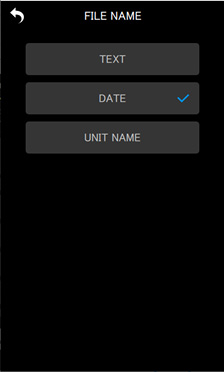
FILE NAME
The format used for file names can be set.
Setting options (default value underlined)
TEXT / DATE / UNIT NAME
TEXT: The 6 characters set with the TEXT item are added to the file name.
Example: DR0000_0001.wav
DATE: The date is used as the file name.
Example: 110101_0001.wav
UNIT NAME: The device name of the DR-10L Pro unit is added to the file name.
Example: DR-10LPro_0001.wav
NOTE
The UNIT NAME must be set on the DEVICE SETTINGS Screen. (see “DEVICE SETTINGS Screen”)
If the UNIT NAME has not been set, “DR-10LPro” will be used for file names.
TIP
If DATE is selected, the file name will be created using the date and time of the unit’s internal clock. Set the clock in advance to enable recording with the correct date and time.
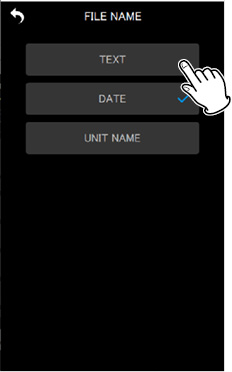
1.Tap the setting menu item.
|
|
|
|
The setting options screen will open.
2.Tap a setting option.
|
|
|
|
The change will be applied and the SYSTEM settings menu screen will reopen.
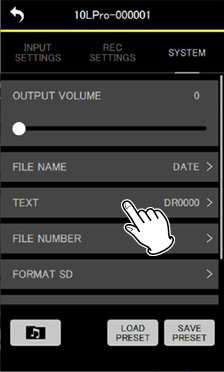
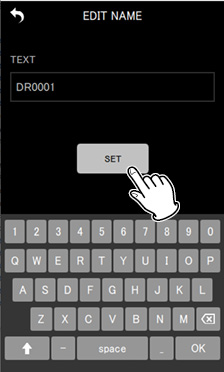
TEXT
Files can be named using 6 selected characters.
Setting options (default value underlined)
DR0000
NOTE
To use the set characters for file names, the FILE NAME item must be set to TEXT.
Using more or less than 6 characters is not possible.
TIP
When using more than one DR-10L Pro unit, you can set the file name in advance to identify which units were used to record files. This can be convenient when editing files.
Examples
|
Characters set for TEXT |
File name |
|
|
1st unit |
DR0001 |
[DR0001_0001.wav] |
|
2nd unit |
DR0002 |
[DR0002_0001.wav] |
|
3rd unit |
DR0003 |
[DR0003_0001.wav] |
|
: |
: |
: |
|
10th unit |
DR0010 |
[DR0010_0001.wav] |
1.Tap the setting menu item.
|
|
|
|
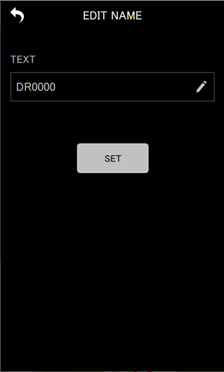
This opens the EDIT NAME screen.
2.Use a keyboard to input characters in the input field.
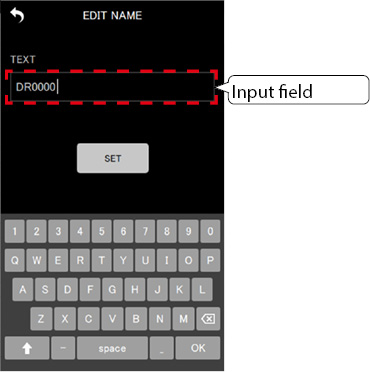
3.Tap the  button.
|
|
|
|
The change will be applied and the SYSTEM settings menu screen will reopen.
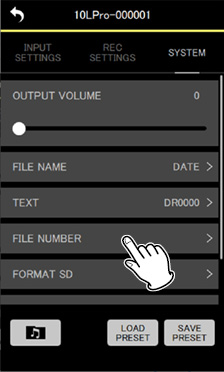
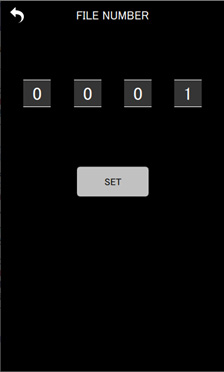
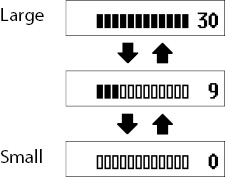
FILE NUMBER
The file number that will be used the next time a file is created can be set.
Settings
Minimum value: 0000
Maximum value: 9999
The set file number will be enabled from the next recording.
NOTE
If a file with the same name and number already exists at the time of recording, “[---]” will be added after the file number. (--- is a three-digit number from 001 to 999.)
If the METADATA function is on, the setting option will be grayed out and the setting content will have no effect.
1.Tap the setting menu item.
|
|
|
|
The setting options screen will open.
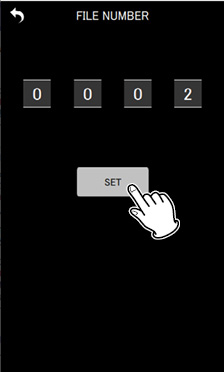
2.Move the numbers up and down to change them.
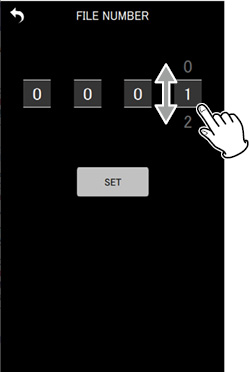
3.Tap the button.
|
|
|
|
The change will be applied and the SYSTEM settings menu screen will reopen.
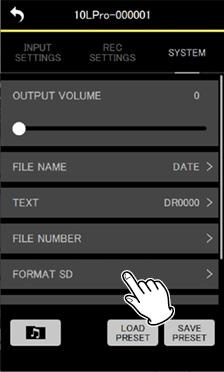
FORMAT SD
This unit can format SD cards.
Setting options (default value underlined)
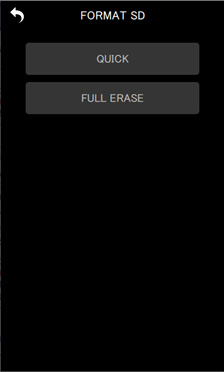
QUICK / FULL ERASE
QUICK: Execute quick formatting.
FULL ERASE: Erase and format.
CAUTION
Formatting will erase all data on a microSD card. Back up to a computer, for example before formatting a card.
When formatting a card, the unit should be on USB bus power supplied from a connected computer or batteries with sufficient remaining power.
NOTE
Using the ERASE format option might improve writing performance that has decreased due to repeated use.
Erase-formatting checks for memory errors as it formats, so it takes more time compared to QUICK formatting.
1.Tap the setting menu item.
|
|
|
|
The setting options screen will open.
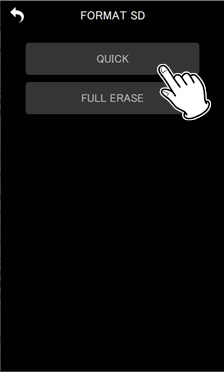
2.Tap the formatting method.
|
|
|
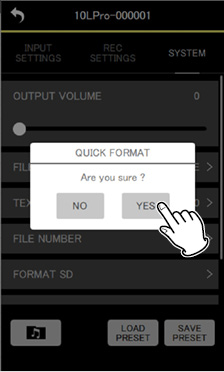
|
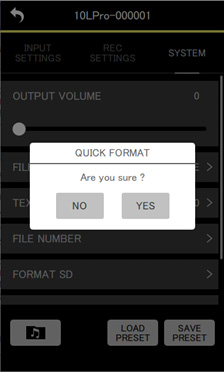
|
Pop-up when QUICK selected |
A confirmation pop-up message will appear.
3.Tap “YES”.
|
|
|
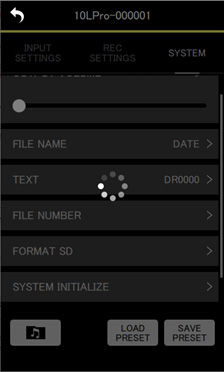
|
![]() will appear, showing that the app is working.
will appear, showing that the app is working.
This will start the formatting process on the DR-10L Pro.
While formatting, the state of progress will be shown on the DR-10L Pro display.


NOTE
No operation is necessary on the hardware unit.

When formatting is complete, the SYSTEM settings menu screen will reopen.
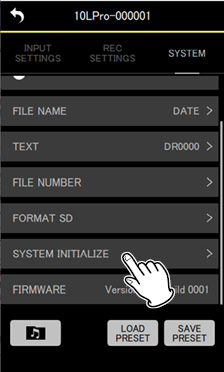
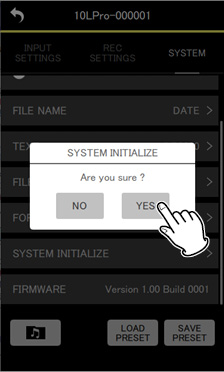
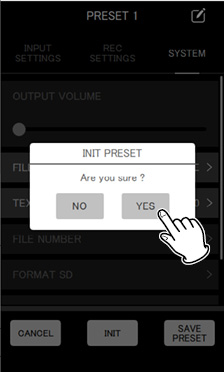
SYSTEM INITIALIZE
The unit can be reset to its factory default settings.
Setting options (default value underlined)
NO / YES
NO: Return to the Menu Screen.
YES: Initialize the settings.
1.Tap the setting menu item.
|
|
|
|
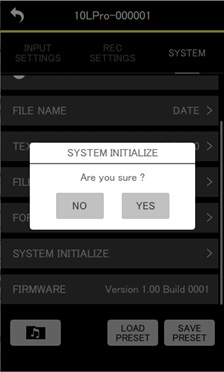
A confirmation pop-up message will appear.
2.Tap “YES”.
|
|
|
|
![]() will appear, showing that the app is working.
will appear, showing that the app is working.
This will start the initialization process on the DR-10L Pro.
While initializing, the state of progress will be shown on the DR-10L Pro display.


After initialization completes, the Home Screen will appear.
A unit that has been initialized will be shown as disconnected.
NOTE
After initialization, the remote control function on the DR-10L Pro unit will be turned off (default value).
To reconnect, turn on the remote control function and connect using SEARCH DEVICES. (See “Enabling the remote control function on a DR-10L Pro unit”, see “Connecting to a DR-10L Pro”.)
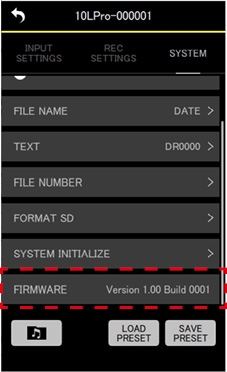
FIRMWARE
This shows the DR-10L Pro unit firmware version.
This app can be used to save and load various DR-10L Pro unit settings as preset data.
A maximum of 5 presets can be saved.
1.Tap “EDIT PRESETS” on the opening screen.
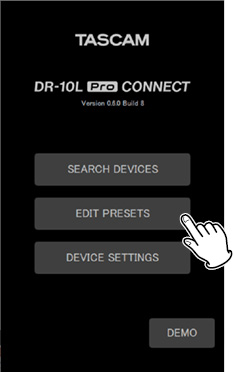
This opens the PRESET LIBRARY Screen.
2.Tap the ![]() icon for the preset you want to edit.
icon for the preset you want to edit.
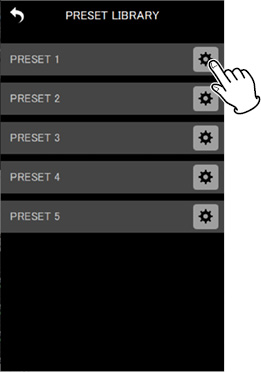
This will open the Preset Settings Screen.
Preset Settings Screen
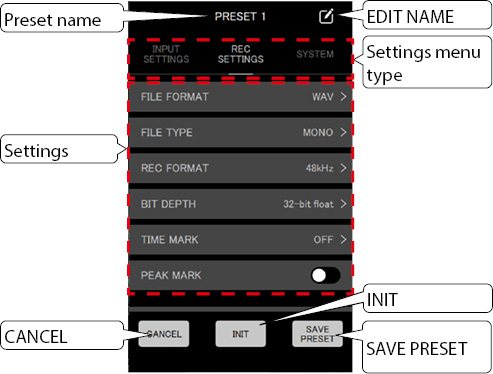
Tap the  button to return to the PRESET LIBRARY Screen without saving the settings.
NOTE
The Preset Settings Screen can also be opened with DEVICE PRESET on the APP SETTINGS Screen. (APP SETTINGS > DEVICE PRESET > ![]() icon for preset to be edited)
icon for preset to be edited)
1.Tap a setting menu item followed by a setting option to change it.
NOTE
See “SETTINGS Screen” for details about setting menus and setting options.
Items that cannot be saved with presets appear gray.
2.After completing changes, tap the  button.
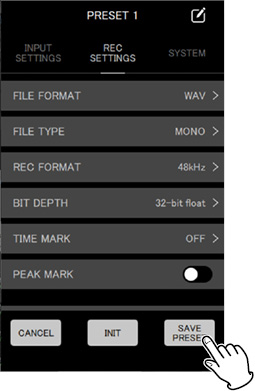
A confirmation pop-up message will appear.
3.Tap “YES”.
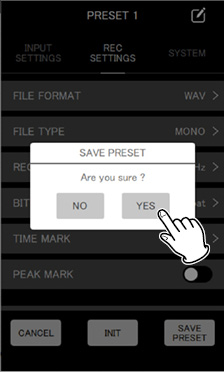
This will save the preset and reopen the PRESET LIBRARY Screen.
1.Tap the ![]() icon to the right of the preset name on the Preset Settings Screen.
icon to the right of the preset name on the Preset Settings Screen.
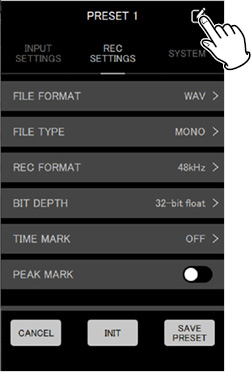
This opens the EDIT NAME screen.
2.Use the keyboard to input the preset name in the input field.
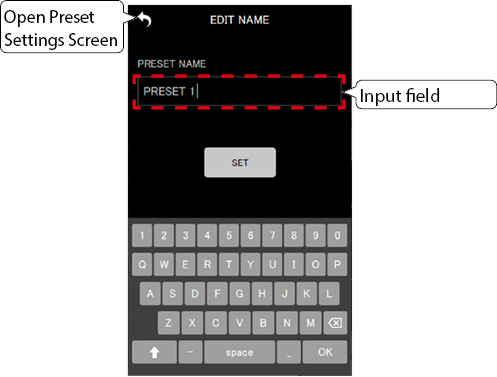
NOTE
Preset names can be up to 15 characters. The default value will be used if it is saved without any characters.
3.Tap the button.
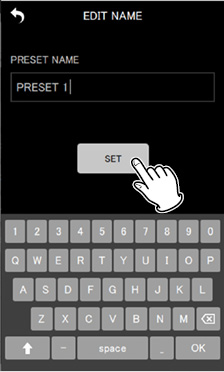
This will save the preset name change and reopen the Preset Settings Screen.
1.Tap the  button on the Preset Settings Screen.

A confirmation pop-up message will appear.
2.Tap “YES”.
This will set the preset to its initial values and reopen the Preset Settings Screen.

NOTE
Presets with default values can be saved.
Settings saved by editing presets can be loaded to change the settings of DR-10L Pro units.
Different procedures can be used to load presets to multiple units or to individual units.
Loading presets to multiple units
Use the DEVICE PRESET item on the APP SETTINGS Screen to load presets to multiple units.
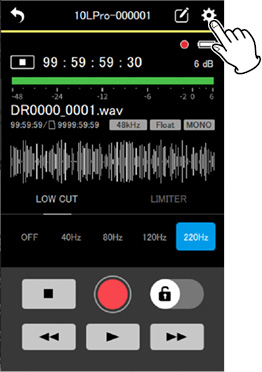
1.Tap the ![]() icon at the top right of the Home Screen.
icon at the top right of the Home Screen.
This opens the APP SETTINGS Screen.
2.Tap DEVICE PRESET.
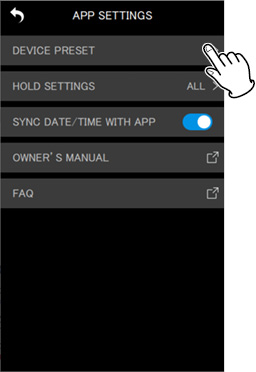
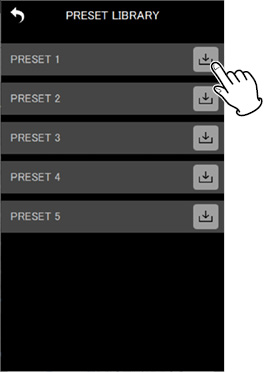
This opens the PRESET LIBRARY Screen.
3.Tap the ![]() icon for the preset you want to load.
icon for the preset you want to load.
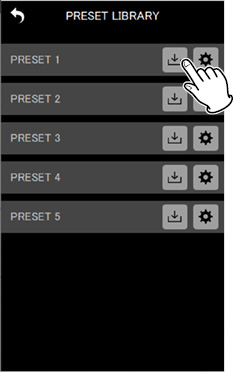
This opens the LOAD PRESET screen.

4.Tap the devices that the loaded preset will be applied to.
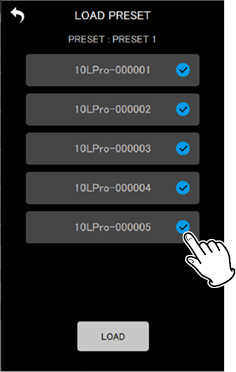
NOTE
The same preset will be applied to all units selected here.
Units that are not connected or are recording/playing will appear gray and cannot be selected.
5.Tap the  button.
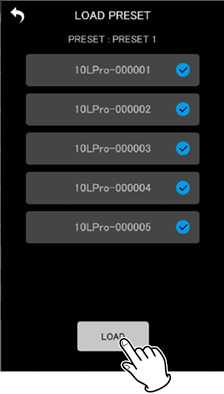
A confirmation pop-up message will appear.
6.Tap “YES”.
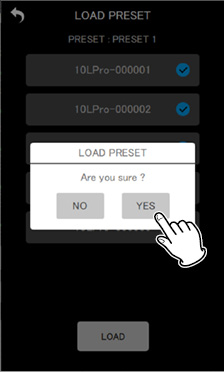
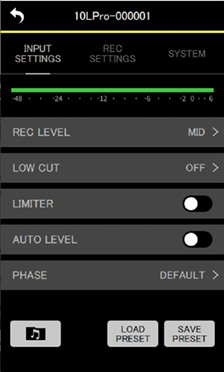
This will apply the settings of the loaded presets to each unit and reopen the PRESET LIBRARY Screen.

Loading presets to individual units
Use the LOAD PRESET item on the SETTINGS Screen of an individual unit to load a preset to it.
1.Tap the ![]() icon at the top right of the individual unit screen.
icon at the top right of the individual unit screen.
This opens the SETTINGS Screen.
2.Tap the  button.
This opens the PRESET LIBRARY Screen.
3.Tap the ![]() icon for the preset you want to load.
icon for the preset you want to load.
A confirmation pop-up message will appear.
4.Tap “YES”.
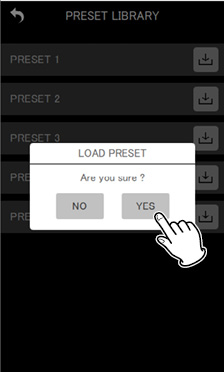
This will apply the settings of the loaded preset and reopen the SETTINGS Screen.
By using this app to set the BLUETOOTH ID and UNIT NAME as device data in advance, the UNIT NAME can be shown as the device name.
Devices that have device data set will always be shown in the AVAILABLE list.
Set device data on the DEVICE SETTING screen.
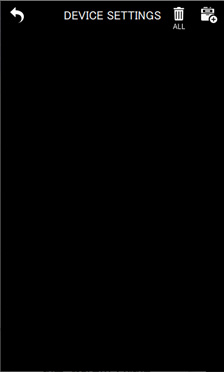
1.Tap “DEVICE SETTINGS” on the opening screen.

This opens the DEVICE SETTINGS Screen.
2.Tap the ![]() icon at the top right of the DEVICE SETTINGS Screen.
icon at the top right of the DEVICE SETTINGS Screen.
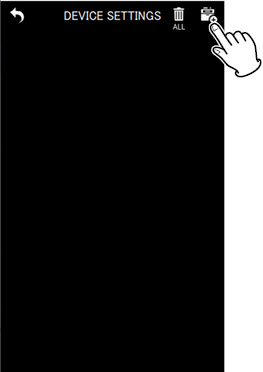
This will open a screen for adding device data settings.
NOTE
Device data for units that have been found using SEARCH DEVICES will already be set and they will be shown on the DEVICE SETTINGS Screen.
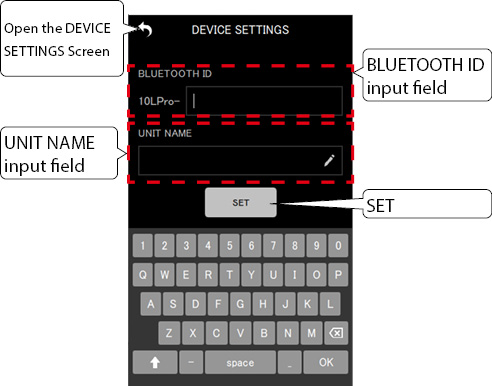
|
BLUETOOTH ID input field |
The default value is empty. The maximum number of characters is 7. Settings cannot be added if this field is left empty. |
|
UNIT NAME input field |
The default value is empty. The maximum number of characters is 11. |
|
|
This saves the settings and reopens the DEVICE SETTINGS Screen. |
3.Tap the BLUETOOTH ID and UNIT NAME input fields and input values for them.
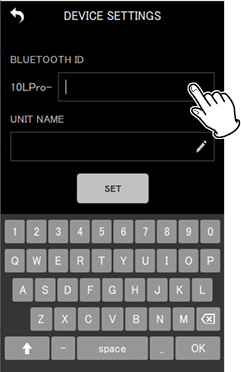
NOTE
If nothing is input for the UNIT NAME, the BLUETOOTH ID will be shown as the device name.
The BLUETOOTH ID can be checked on the DR-10L Pro using the 26: BT ID item of the Menu Screen.
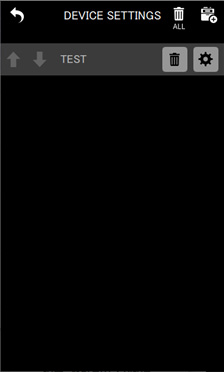
4.Tap the button.
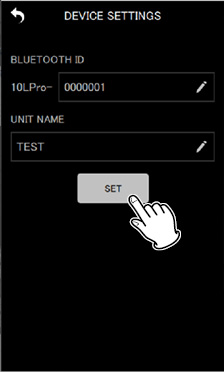
This reopens the DEVICE SETTINGS Screen.
The set device data will be shown.
5.Repeat steps 2 – 4 as necessary to make settings.
NOTE
The ![]() and
and ![]() icons can be used to switch the display order.
icons can be used to switch the display order.
Device data can be set for up to 99 units.
New devices cannot be found if device data for 99 units has already been added. Device data can be removed from the DEVICE SETTINGS Screen to enable finding new devices. See “Removing device data” for how to remove devices.
Registered device data can be removed.
Device data can be removed for all devices or for individual devices using different methods.
Removing device data for all devices
1.Tap “DEVICE SETTINGS” on the opening screen.
This opens the DEVICE SETTINGS Screen.
2.Tap the ![]() icon at the top right of the DEVICE SETTINGS Screen.
icon at the top right of the DEVICE SETTINGS Screen.
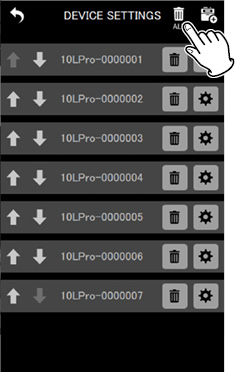
A confirmation pop-up message will appear.
3.Tap “YES”.
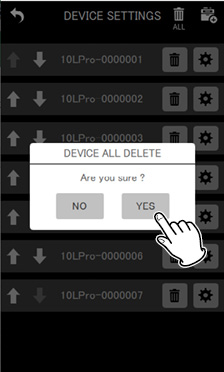
This will remove device data for all registered devices.
Removing data for individual devices
1.Tap “DEVICE SETTINGS” on the opening screen.
This opens the DEVICE SETTINGS Screen.
2.Tap the ![]() icon for the data you want to remove.
icon for the data you want to remove.
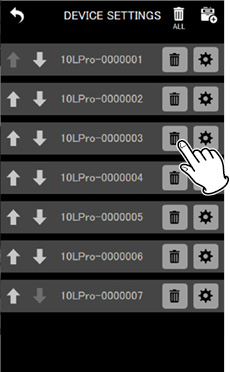
A confirmation pop-up message will appear.
3.Tap “YES”.
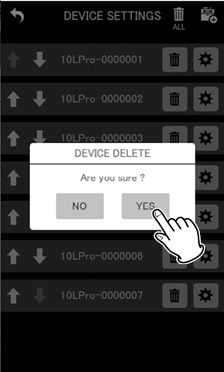
The selected device data will be removed.
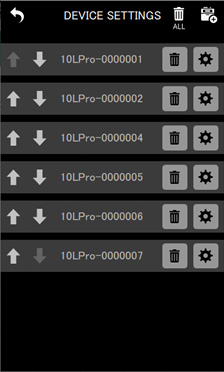
4.Repeat steps 2 – 3 as necessary to remove more data.
The app can be used to conduct operations on files in individual units.
Work with files on the BROWSE Screen.
Tap the  button on the SETTINGS Screen (see “Changing DR-10L Pro unit settings”) for the individual unit with the desired file to open the BROWSE Screen.
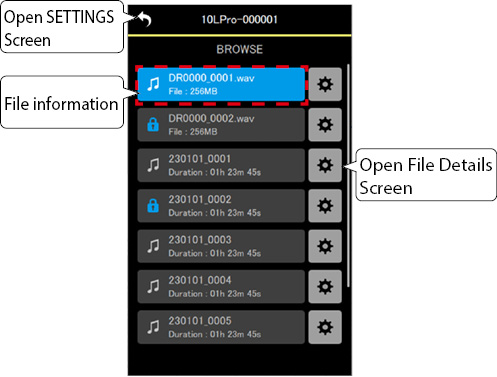
File information
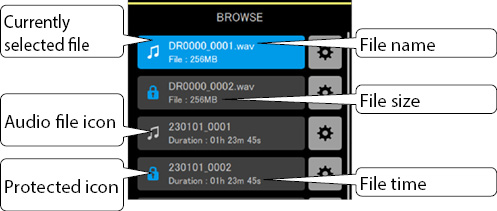
|
Currently selected file |
The currently selected file is shown with a blue background. |
|
Audio file icon |
Audio files are shown with |
|
Protected icon |
Protected files are shown with |
|
File name |
This shows the file name. |
|
File size |
This shows the file size. |
|
File time |
This shows the file playback time. |
Tap the file you want to select.
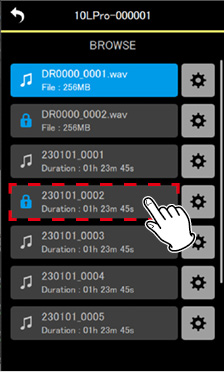
The individual unit screen will reopen with the selected file shown.
Tap the ![]() icon to the right of the file for which you want to see detailed information.
icon to the right of the file for which you want to see detailed information.
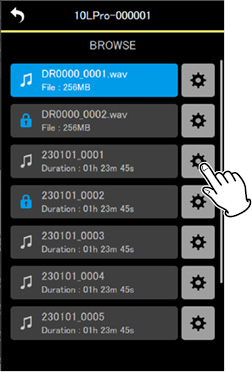
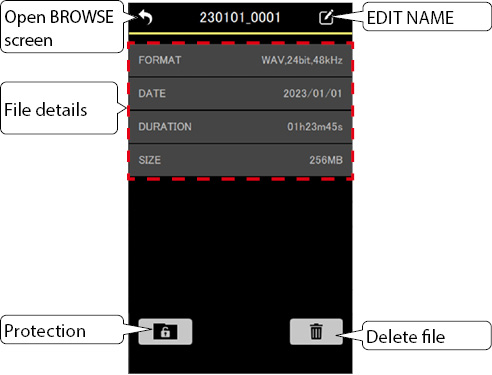
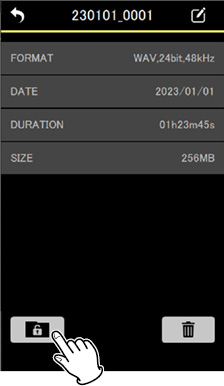
This will open a File Details Screen.
|
EDIT NAME |
The names of recording files saved on the DR-10L Pro can be changed. Files that cannot be changed will appear gray. |
|
File details |
This shows the FORMAT, DATE, DURATION (recorded time) and SIZE. |
|
Protection |
This turns protection on/off for the selected file. |
|
Delete file |
This deletes the selected file. |
1.Tap the ![]() icon to the right of the file name to open the File Details Screen.
icon to the right of the file name to open the File Details Screen.
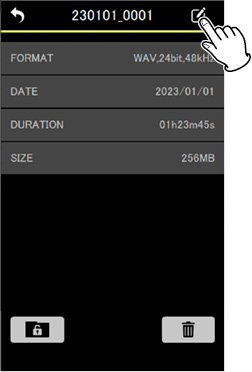
This opens the EDIT NAME screen.
NOTE
The ![]() icons for files with names that cannot be changed will appear gray.
icons for files with names that cannot be changed will appear gray.
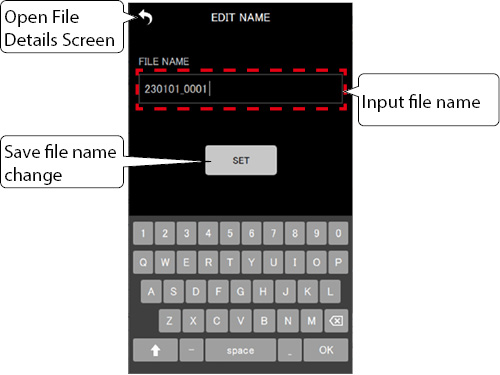
2.Input the file name, and tap the button.
The File Details Screen will reopen.
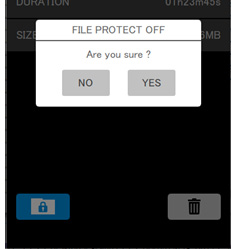
10 - 5 Setting file protection
Protection can be set for files. When protection for a file is on, that file cannot be deleted or edited.
1.Tap the  icon on the bottom left of the File Details Screen.
NOTE
The button will appear blue for files that have protection on.
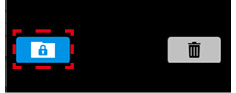
This operation will turn off protection for files that have it on.
A confirmation pop-up message will appear.
2.Tap “YES”.
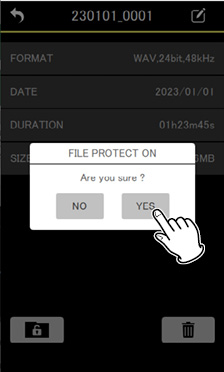
This will change the protection setting.
NOTE
For files that have protection on, a pop-up message appears confirming turning protection off.
1.Tap the  icon on the bottom right of the File Details Screen.
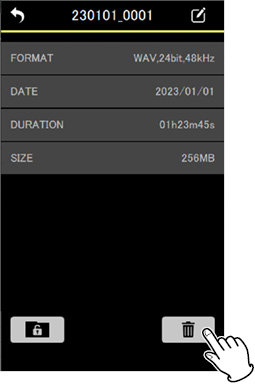
A confirmation pop-up message will appear.
2.Tap “YES”.
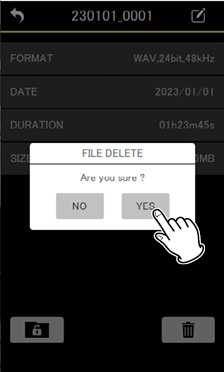
This will delete the file.
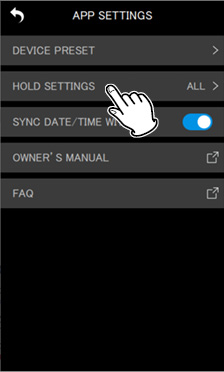
11 - 1 Setting the HOLD function
By setting the HOLD function, misoperation when recording can be prevented.
The following behaviors can be set using the HOLD SETTINGS item on the APP SETTINGS Screen.
|
ALL |
All operations other than turning off the HOLD function are disabled (default setting). |
|
TRANSPORT ONLY |
Operation is disabled for the record, stop, play, search forward and search backward buttons. |
|
|
|
|
By turning on the SYNC DATE/TIME WITH APP sitting on the APP SETTINGS Screen, time data from the device can be applied to DR-10L Pro units (on by default).
|
|
|
|
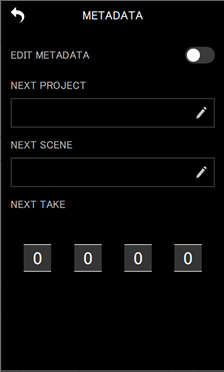
After metadata (project names, scene names and take numbers) is set, it can be added to the iXML data of files recorded later.
Set the metadata to be added on the METADATA Screen.
|
|
|
|
The data that will be written to iXML can be set on this screen.
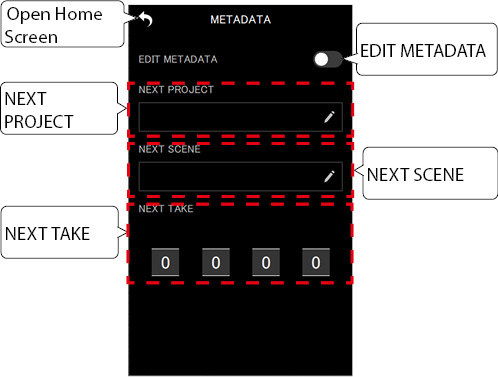
|
EDIT METADATA |
This turns the metadata editing function on/off. |
|
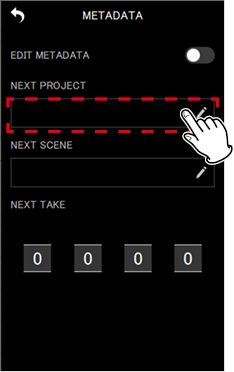
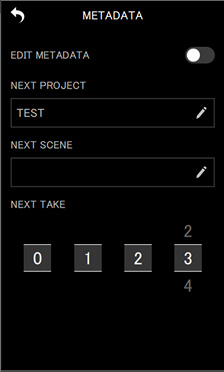
NEXT PROJECT |
Input a project name with 15 characters or less. Tap inside the field to open the character input keyboard. |
|
NEXT SCENE |
Input a scene name with 15 characters or less. Tap inside the field to open the character input keyboard. |
|
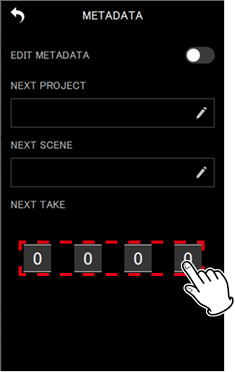
NEXT TAKE |
Set the take number. Tap the number fields to open number selection lists. |
If EDIT METADATA is set to on when the Home Screen is reopened, the data will be transmitted to the connected DR-10L Pro units.
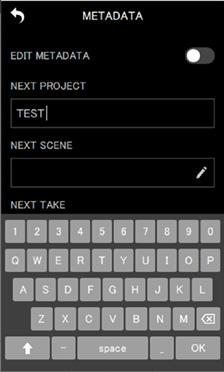
|
|
|
|
|
METADATA Screen |
Character input screen |
|
|
|
|
|
METADATA Screen |
Number selection list |
NOTE
If EDIT METADATA is set to on, the NEXT TAKE number will be applied to the ends of file names.
11 - 4 Identifying the unit being controlled
This causes the DR-10L Pro unit display to blink, enabling confirmation of the unit being controlled.
1.Tap the ![]() icon at the top right of the individual unit screen.
icon at the top right of the individual unit screen.
|
|
|
|
This opens the DEVICE SETTINGS Screen.
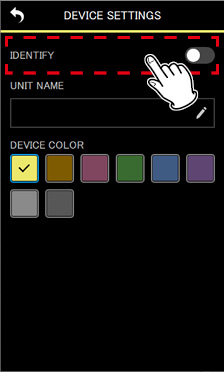
2.Tap “IDENTIFY”.
|
|
|
|
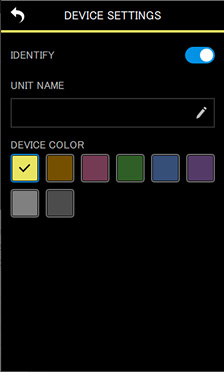
This turns on the IDENTIFY function, which causes the display of the corresponding unit to blink.
NOTE
While IDENTIFY is on, the display of the corresponding unit will blink.
The IDENTIFY function will turn off automatically when the DEVICE SETTINGS Screen is reopened.
The UNIT NAME can be set to give the DR-10L Pro hardware the desired name.
The UNIT NAME is used for the device name display.
The UNIT NAME can be added to the names of files with recording.
When a microSD card is formatted, the UNIT NAME will be used for the volume label.
The UNIT NAME is set on the DEVICE SETTINGS Screen of the individual unit.
1.Tap the ![]() icon at the top right of the individual unit screen.
icon at the top right of the individual unit screen.
|
|
|
|
This opens the DEVICE SETTINGS Screen.
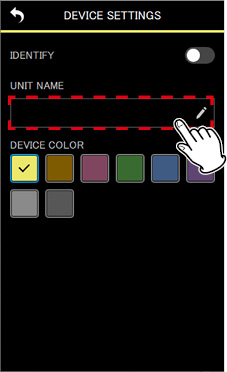
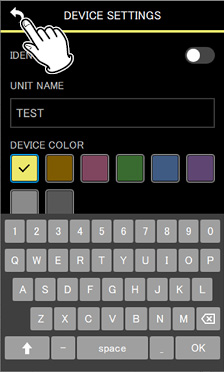
2.Tap the UNIT NAME input field.
|
|
|
|
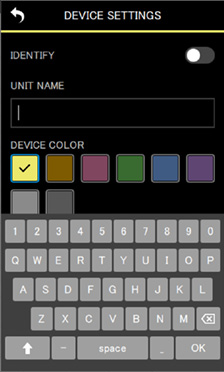
A keyboard will be shown.
3.Input the UNIT NAME.
4.Tap the ![]() icon at the top left.
icon at the top left.
|
|
|
|
The UNIT NAME change will be applied and the individual unit screen will reopen.
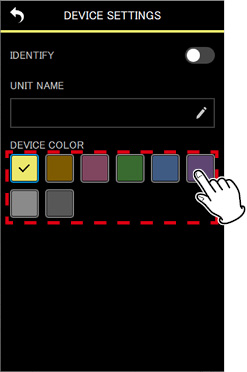
11 - 6 Setting the DEVICE COLOR
Colors can be selected and set for each unit.
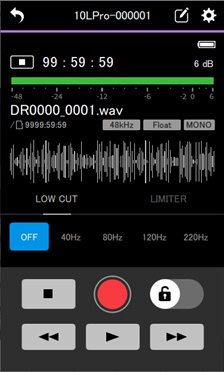
The DEVICE COLOR is used for various device indications on the Home Screen and the individual unit screen.
|
|
|
|
|
Areas where colors are shown on the Home Screen |
Areas where colors are shown on individual unit screens |
The DEVICE COLOR is set on the DEVICE SETTINGS Screen of the individual unit.
1.Tap the ![]() icon at the top right of the individual unit screen.
icon at the top right of the individual unit screen.
|
|
|
|
This opens the DEVICE SETTINGS Screen.
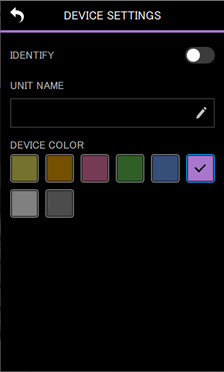
2.Tap the desired color.
|
|
|
|
The color will be applied as soon as it is tapped.
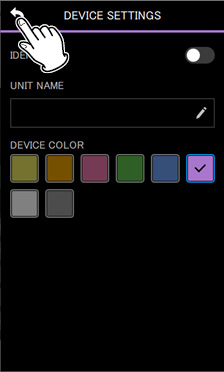
3.Tap the ![]() icon at the top left.
icon at the top left.
|
|
|
|
This reopens the individual unit menu.
NOTE
The same color can be set for multiple units.
Since color settings are saved in DR-10L Pro units, the same colors will be shown the next time they are connected.
0523.MA-3682A