|
|
D01450920C |

Professional Bluetooth Audio Receiver
Owner's Manual
|
|
D01450920C |
Professional Bluetooth Audio Receiver
Owner's Manual
Thank you very much for purchasing the TASCAM RX-BT10.
Before using this unit, read this Owner's Manual carefully so that you will be able to use it correctly and enjoy working with it for many years. After you have finished reading this manual, please keep it in a safe place for future reference.
You can also download this Owner’s Manual from the TASCAM website.
|
|
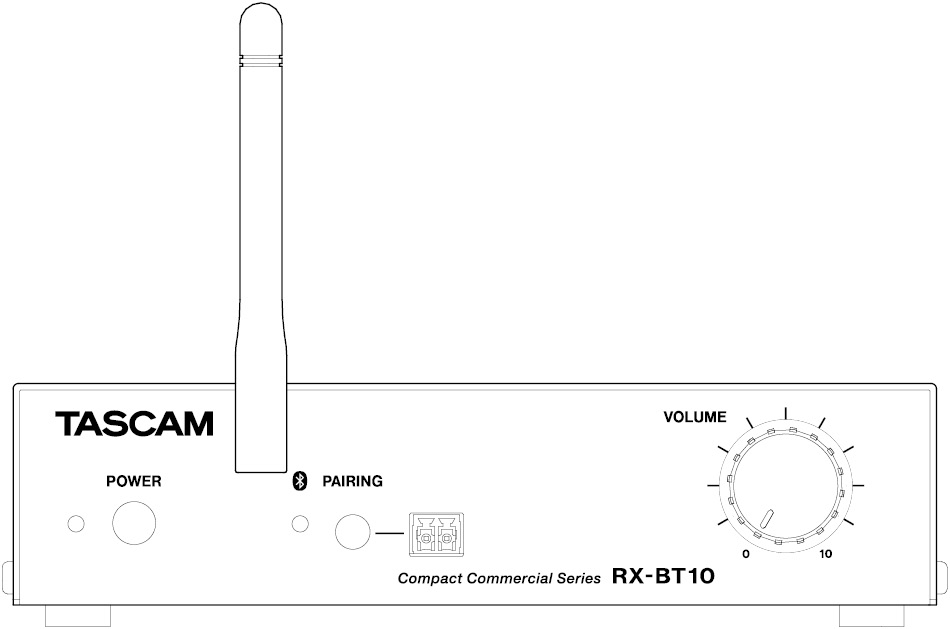
RX-BT10 |
The TASCAM RX-BT10 is a professional Bluetooth audio receiver that enables the easy addition of smartphones, tablets and other Bluetooth devices to existing audio systems.
 Equipped with balanced XLR outputs
Bluetooth 5.1 (Class 1) enables stable connections over long distances
Compact and durable build
This product includes the following items.
Take care when opening the package to avoid damaging the items. Keep the box and packing materials for transportation in the future.
Please contact the store where you purchased this unit if any of these items are missing or have been damaged during transportation.
Main unit (with Euroblock plug) × 1
AC adapter (TASCAM PS-M1524) × 1
Cord for AC adapter (Type A for Japan and US / Type C for Europe) × 1
Bluetooth antenna × 1
Installation bracket kit
- Brackets × 2
- Installation screws × 6
Safety Guide × 1
TASCAM ID registration guide × 1
ATTENTION
Always use the included AC adapter (TASCAM PS-M1524) and AC adapter cord with this unit.
Never use the included AC adapter with any other device. Doing so could cause damage, fire or electric shock.
The duplication, broadcast, showing, cable broadcast, public performance and rental (including without charge) of protected content without permission is prohibited by law.
The Bluetooth®word mark and logos are registered trademarks owned by Bluetooth SIG, Inc. and any use of such marks by TEAC CORPORATION is under license.
TASCAM is a registered trademark of TEAC Corporation.
Other company names, product names and logos in this document are the trademarks or registered trademarks of their respective owners.
|
Information is given about products in this manual only for the purpose of example and does not indicate any guarantees against infringements of third-party intellectual property rights and other rights related to them. TEAC Corporation will bear no responsibility for infringements on third-party intellectual property rights or other liabilities that occur as a result of the use of this product. |
|
Properties copyrighted by third parties cannot be used for any purpose other than personal enjoyment and the like without the permission of the right holders recognized by copyright law. Always use this equipment properly. TEAC Corporation will bear no responsibility for rights infringements committed by users of this product. |
Conventions used in this manual
We use the following conventions in this manual.
Smartphones, tablets and other devices connected to this unit using Bluetooth are called “Bluetooth devices”.
As necessary, additional information is provided under TIP, NOTE, ATTENTION and CAUTION headings.
TIP
These are tips about how to use the unit.
NOTE
These provide additional explanations and describe special cases.
ATTENTION
Failure to follow these instructions could result in damage to equipment or lost recording data, for example.
 CAUTION
Failure to follow these instructions could result in injury.
Precautions for placement and use
The guaranteed operating temperature range of this unit is 0–40°C.
Do not install this unit in the following types of locations. Doing so could make the sound quality worse or cause malfunction.
- Places with significant vibrations
- Next to a window or in another location exposed to direct sunlight
- Near heaters or other extremely hot places
- Extremely cold places
- Very humid or poorly ventilated places
- Very dusty places
To enable good heat dissipation, do not place anything on top of the unit.
Do not place the unit on top of a power amplifier or other device that generates heat.
Condensation could occur if the unit is moved from a cold place to a warm place, it is used immediately after a cold room has been heated or it is otherwise exposed to a sudden temperature change.
To prevent this, or if this occurs, let the unit sit for one or two hours at the new room temperature before using it.
Use a dry soft cloth to wipe the unit clean.
Do not wipe with chemical cleaning cloths, thinner, alcohol or other chemical agents.
Doing so could damage the surface or cause discoloration.
About TASCAM customer support service
TASCAM products are supported and warrantied only in their country/region of purchase.
To receive support after purchase, on the TASCAM Distributors list page of the TEAC Global Site, search for the local company or representative for the region where you purchased the product and contact that organization.
When making inquiries, the address (URL) of the shop or web shop where it was purchased and the purchase date are required. Moreover, the warranty card and proof of purchase might also be necessary.
This unit has a built-in Bluetooth 5.1 audio receiver, and can output sound played on a computer or portable audio device that supports Bluetooth (Bluetooth device).
ATTENTION
The Bluetooth function of this unit is not guaranteed to enable connection or operation with all Bluetooth devices.
This unit supports the following Bluetooth profiles.
A2DP (Advanced Audio Distribution Profile)
AVRCP (Audio/Video Remote Control Profile)
In order to transfer audio by Bluetooth, the Bluetooth device must support A2DP.
In order to control playback on the Bluetooth device, it must support AVRCP.
Even if a Bluetooth device supports the same profiles, though, its functions might differ according to its specifications.
This unit supports the following A2DP codecs. It will automatically select one of them during audio transfer.
SBC
AAC
The unit will select the appropriate A2DP codec to use according to the codec compatibility of the other Bluetooth device and communication conditions.
NOTE
The A2DP codec to be used cannot be selected by pressing a button, for example.
Due to characteristics of Bluetooth wireless technology, playback from a Bluetooth device will be slightly delayed compared to playback from this unit.
This unit supports SCMS-T as a form of content protection when transmitting audio, so it can play protected audio.
This unit supports security functions during Bluetooth transmission in accordance with the Bluetooth standard specifications, but it does not guarantee the privacy of such transmissions.
TEAC Corporation will bear no responsibility should an information leak occur during transmission by Bluetooth.
ATTENTION
Turn off the power to this unit or minimize the volume before changing the switch settings on this unit.
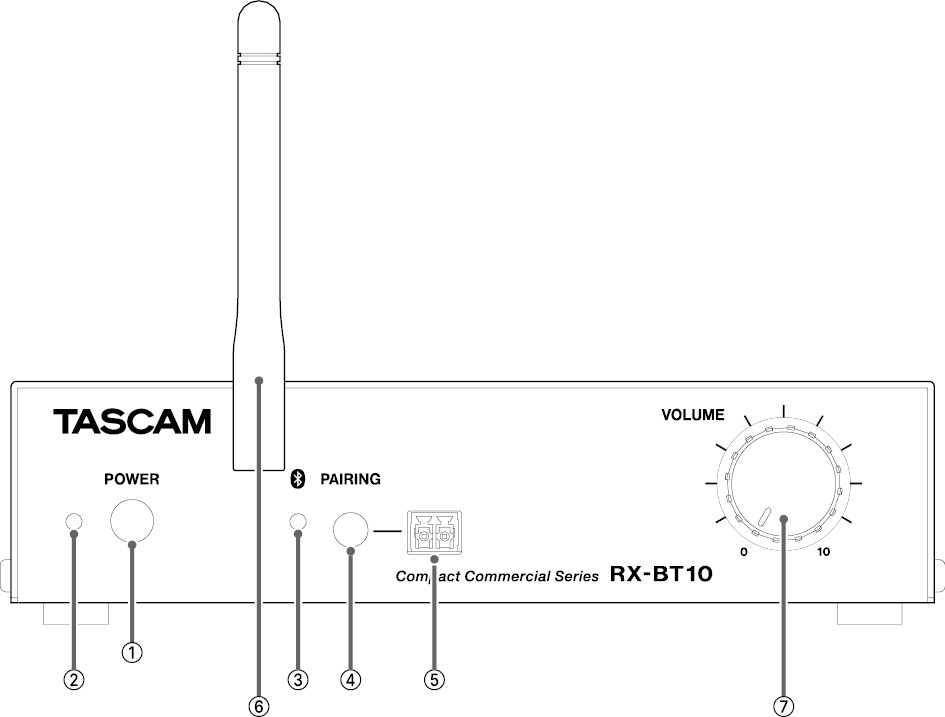
 POWER switch
Press to turn the unit on and off.
The POWER indicator lights when the unit is on.
 POWER indicator
When the POWER switch on the unit is turned on, the POWER indicator lights green.
 Bluetooth indicator
This blinks while pairing and stays lit when connected.
 Bluetooth PAIRING button
Use this button to pair with Bluetooth devices.
(“Connecting with Bluetooth devices”)
 Remote PAIRING connector
The pairing button can be extended by connecting a commercially-available 2-wire-format push momentary switch (button) to this connector using the included 2-pin Euroblock connector.
(“Connecting Euroblock plugs”)
 Bluetooth antenna connector
Connect the included Bluetooth antenna here.
 Output level knob
Use this to adjust the volume of Bluetooth output.
Turn this clockwise to increase the volume. Turn it completely counterclockwise to minimize the volume output.
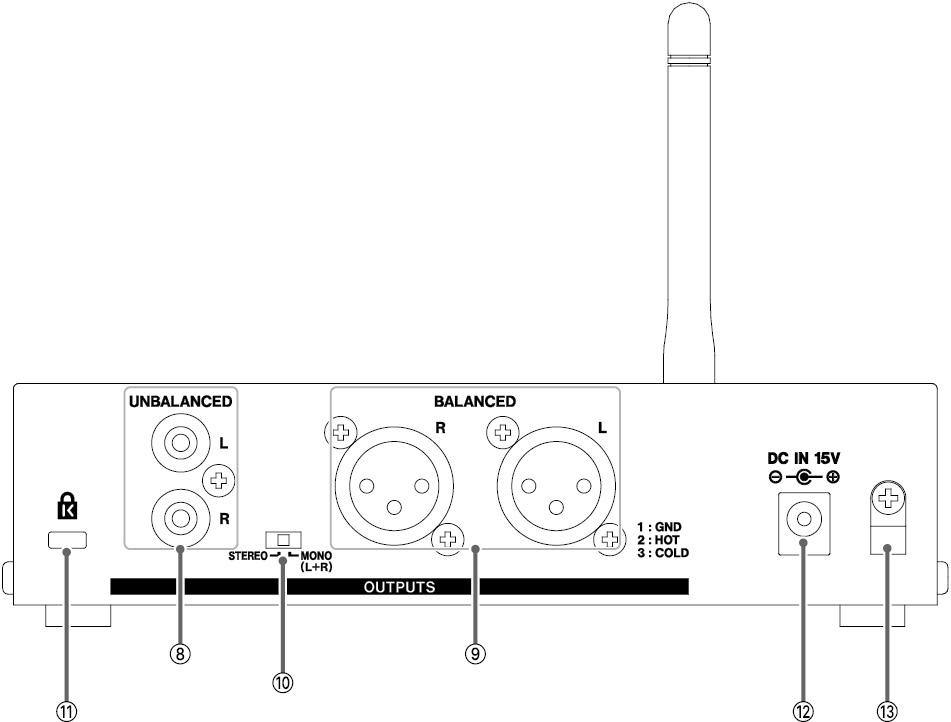
 Output jacks (unbalanced)
These are unbalanced RCA stereo output jacks.
Use these to output signals to the line input connectors of other devices.
 Output jacks (balanced)
These are balanced XLR stereo output jacks.
Use these to output signals to the line input connectors of other devices.
 Mono/stereo switch
This switches the output format of the output jacks (/) between stereo and L+R mono.
 Kensington Security Slot
The unit can be secured by inserting a Kensington Lock.
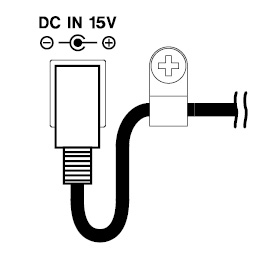
 DC IN 15V connector
Connect the DC plug of the included AC adapter (TASCAM PS-M1524) here.
 Cord holder
Attach the power cord of the included AC adapter (TASCAM PS-M1524) here to prevent accidental disconnection.
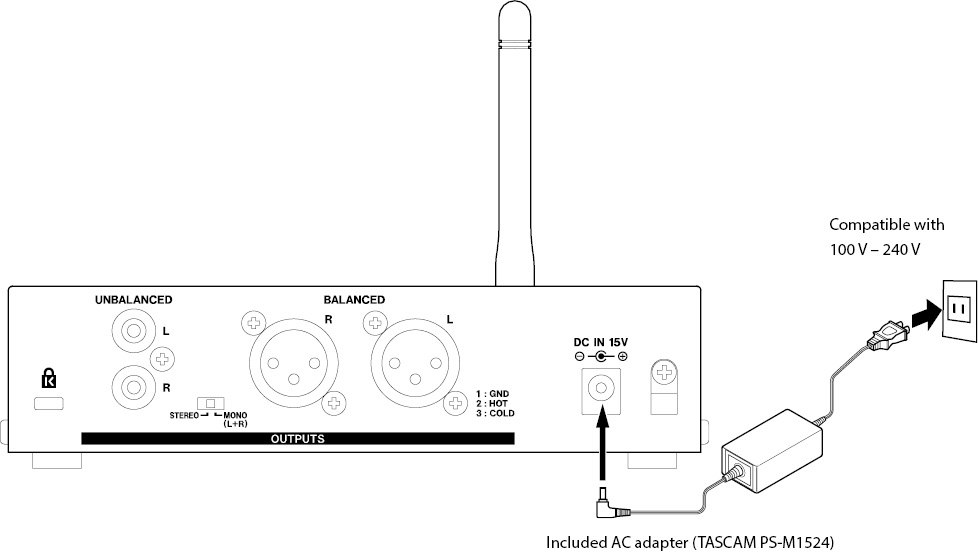
Use the included AC adapter (PS-M1524) to connect a power supply to the unit as shown below.
ATTENTION
Always use the AC adapter (TASCAM PS-M1524) and AC adapter cord that were shipped with this product.
Using a different AC adapter could cause malfunction, overheating, fire or other problems.
NOTE
The AC adapter for the unit includes two types of adapter cords.
Attach the type of AC adapter cord that matches the voltage and type of power outlet being used.
In order to prevent the cord from becoming disconnected during use, attach it to the cord holder () when connecting it to the unit.
1.Remove the cord holder screw.
2.Place the cord in the cord holder.
3.Secure the cord holder screw.
Attaching the Bluetooth antenna
Before connecting to a Bluetooth device, follow these procedures to attach the included Bluetooth antenna.
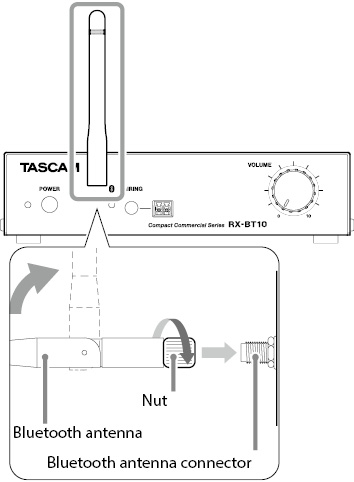
1.Attach the included Bluetooth antenna to the Bluetooth antenna connector.
2.Turn the Bluetooth antenna nut to secure it to the antenna connector.
3.Raise the Bluetooth antenna.
ATTENTION
Use the included antenna, which was designed for use with the RX-BT10.
Be careful with the bending direction of the antenna. Do not forcefully bend it.
The antenna can be elongated by using a commercially-available cable with an RP-SMA connector.
For the antenna cable, use one with 50 Ω impedance that is 20 m or less.
ATTENTION
When elongating the antenna cable, use the antenna parts included with the product.
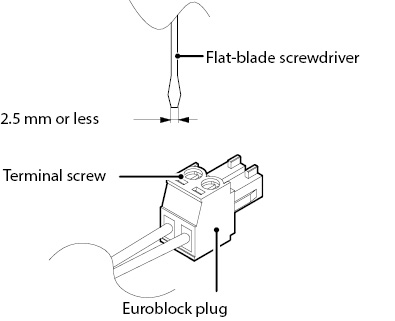
1.Loosen the Euroblock plug terminal screws.
NOTE
Use a flat-blade screwdriver with a width of 2.5 mm or less.
2.Insert wires.
NOTE
AWG16–AWG28 cables are compatible with the included Euroblock plug. Using wires within the compatible range, trim about 7 mm of the protective sheaths from their ends.
3.Tighten the Euroblock plug terminal screws.
NOTE
Confirm that the wires cannot be pulled out.
The pairing button can be extended by connecting a commercially-available 2-wire momentary push switch (button).
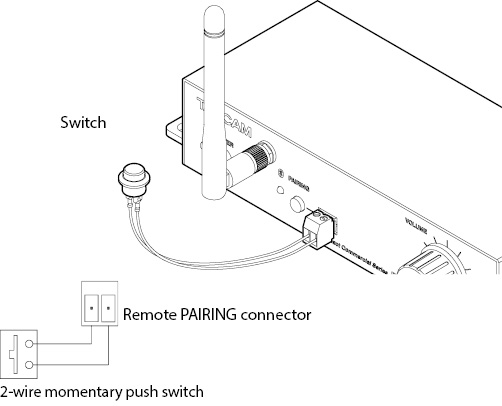
This is an example of connections.
Precautions before making connections
Carefully read the operation manuals of the devices to be connected and then connect them correctly.
Before making connections, turn this unit and all equipment to be connected off (standby).
Before connecting audio equipment, turn down the output level knob (). Failure to do so could cause sudden loud noises from monitoring equipment, and this could damage the equipment or harm hearing.
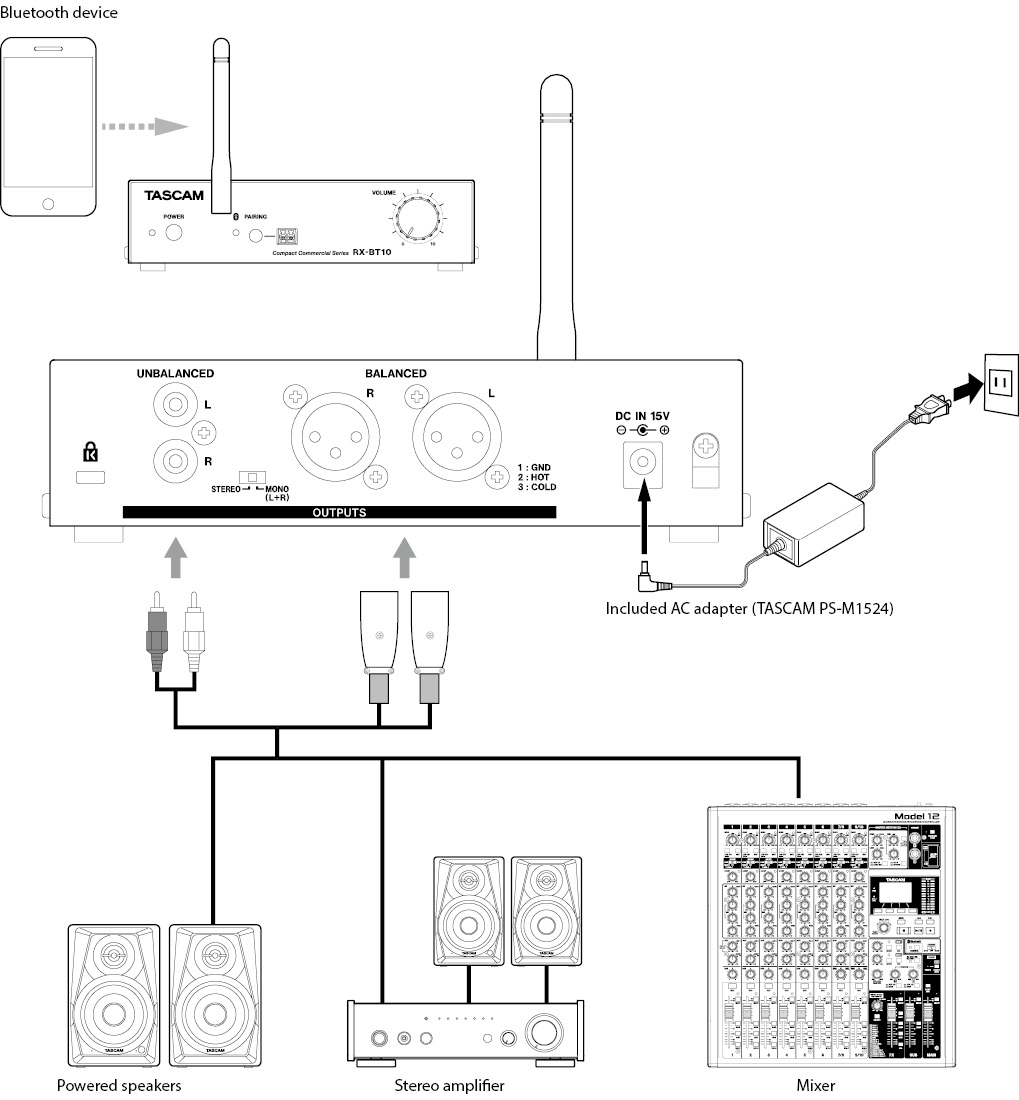
Connecting with Bluetooth devices
Connect the included antenna to the front panel in order to use Bluetooth.
Pairing
1.Press the PAIRING button on the front panel for at least two seconds.
The indicator to the side of the PAIRING button will blink while pairing.
2.Operate the Bluetooth device to be connected to this unit.
Refer to the operation manual of that Bluetooth device for connection procedures.
The indicator stays lit when connected to a Bluetooth device.
3.Operate the connected Bluetooth device and adjust the volume.
When a Bluetooth device is connected, playback will be paused.
After adjusting the Bluetooth device volume, start playback.
Bluetooth volume cannot be adjusted by itself with this unit.
Adjust the volume on the Bluetooth device.
ATTENTION
The Bluetooth function is designed to use AVRCP basic commands to transmit playback pause commands. Operation is not guaranteed, however, with all devices.
Before connecting, minimize the output level knob and the Bluetooth device volume.
NOTE
When this unit is turned on, it will automatically try to connect with the Bluetooth device to which it was previously connected.
At this time, connection will automatically be canceled if connection is not possible because that Bluetooth device is not turned on or its Bluetooth function is turned off.
About the name of this model when shown on other Bluetooth devices
Units will appear with the name “RX-BT10-XXXXXX” on other Bluetooth devices. “XXXXXX” is a 6-digit random alphanumeric code that is different for each unit.
This allows individual units to be identified.
The name of a unit can be changed, though, using the functions of an iOS, iPadOS or Android device.* However, the changed unit name will only be used on that iOS, iPadOS or Android device. Be aware that the name shown will not be changed on other Bluetooth devices.
*Check the operation procedures for the device being used to change the name.
Disconnecting
The Bluetooth device that is currently connected can be disconnected from the unit.
Press the PAIRING button on the front panel for at least two seconds.
This ends the connection. The indicator will start blinking and the unit will be ready to connect.
NOTE
After about two minutes pass, the indicator will become unlit and Bluetooth will turn off.
Pressing the PAIRING button for at least two seconds while the indicator is blinking will make it become unlit and turn off Bluetooth.
Pairing with up to 8 devices is possible. Pairing a 9th device will remove the pairing with the 1st device.
This unit does not have an operation to remove pairings.
If a device leaves the connection range while connected, it will reconnect automatically if brought back in range within one minute. Automatic reconnection will not occur if more than one minute passes. Manual connection will be necessary.
Attaching the installation brackets
By attaching the included installation brackets on this unit, it can be fixed in place on top of or underneath a desk, for example.
Align the included installation brackets with the sides of the enclosure, and use the 6 included screws to attach the brackets to the unit.
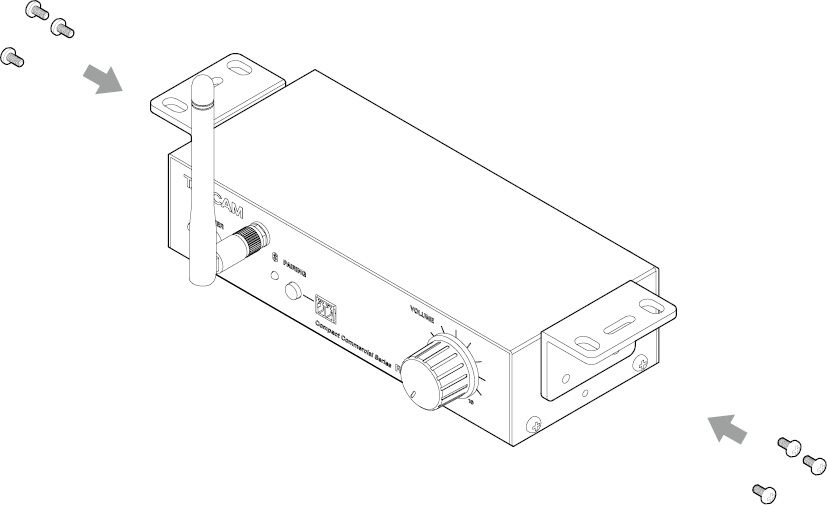
NOTE
When installing this unit on a desk, align the brackets and use the 6 included screws to attach them as shown in the illustration below.
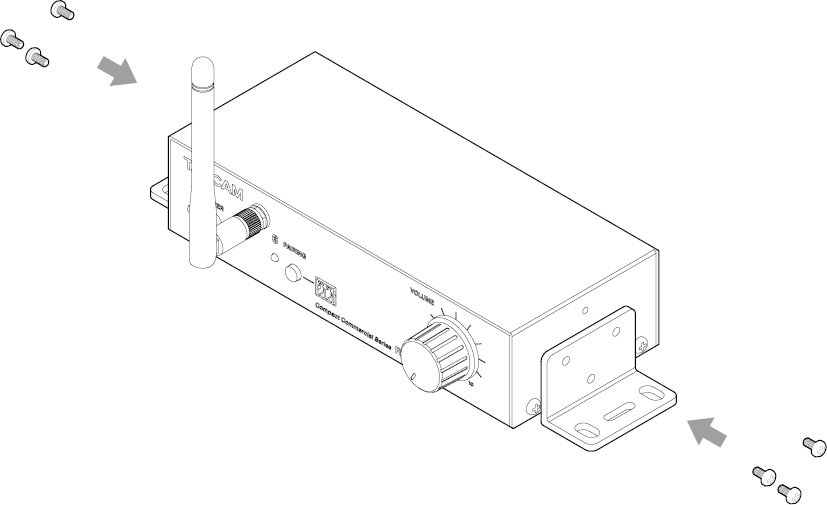
ATTENTION
Always use the included screws.
Use of screws other than the included ones could cause damage inside the unit.
If they are lost, use M3 Screws with a length of 6 – 10 mm.
Rack-mounting using an AK-RS1 (sold separately)
An AK-RS1 must first be attached before mounting this unit in a rack.
Refer to the illustrations below when attaching them.
NOTE
Remove the rubber feet from units before attaching them to this.
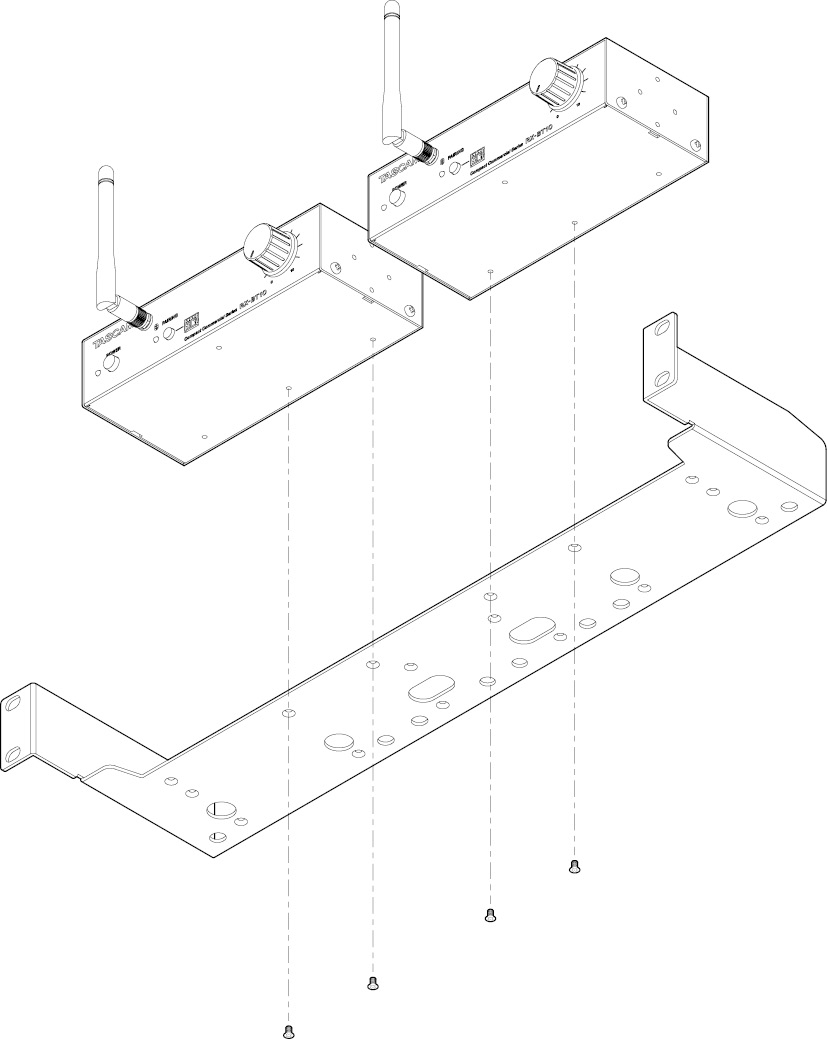
NOTE
When installing units toward the back, align them with the AK-RS1 as shown in the illustration below.
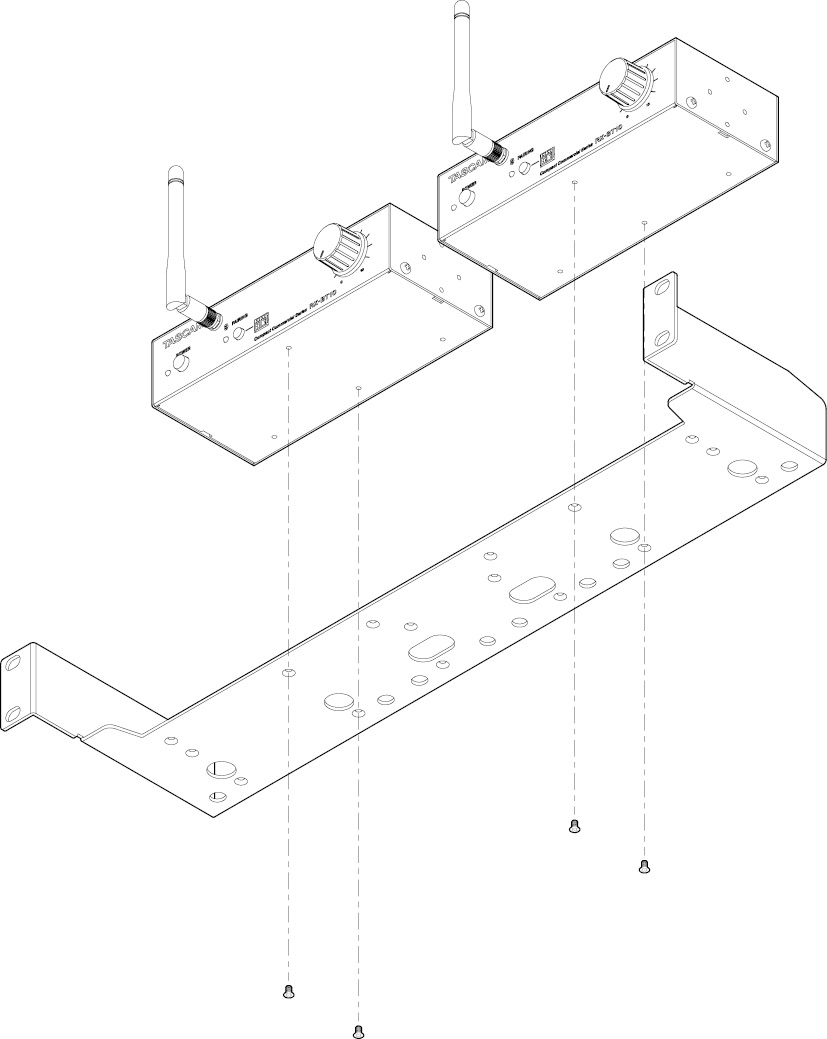
ATTENTION
Always use the screws included with the AK-RS1.
Use of screws other than the included ones could cause damage inside the unit.
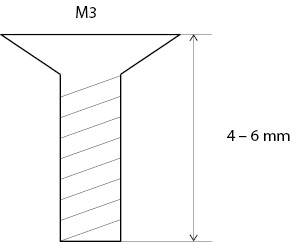
If they are lost, use M3 countersunk screws with a length of 4 – 6 mm.
If you are having trouble with the operation of this unit, please try the following before seeking repair. If these measures do not solve the problem, please contact the store where you purchased this unit or TASCAM customer support service.
The unit will not turn on
Confirm that the power plug and other connectors are inserted completely.
The sound distorts
Turn the output level knob to reduce the volume.
Lower the output volume of the paired Bluetooth device.
The volume is low even when the output level knob is turned up
Raise the output volume of the paired Bluetooth device.
No sound is output
Confirm that the other Bluetooth device is paired.
Confirm that output cables are connected securely.
Confirm that the output level knob is turned up.
Confirm that volume is turned up on the other Bluetooth device.
Cannot pair with another Bluetooth device
Confirm that the other Bluetooth device supports A2DP.
Confirm that the other Bluetooth device is in a state that allows transmission.
For details, check the operation manual of that Bluetooth device.
Turn the power off for both this unit and the other Bluetooth device once, turn them both on again and try pairing them.
Confirm that the other Bluetooth device is not too far away.
Are there walls or other obstacles, for example, between this unit and the other Bluetooth device?
Try changing the positions of this unit and the other Bluetooth device.
|
Bluetooth® |
||
|
Version |
5.1 |
|
|
Output class |
1 (about 100 m unobstructed transmission range*) |
|
|
Supported profiles |
A2DP, AVRCP |
|
|
Supported codecs |
SBC, AAC |
|
* Transmission distance is estimated. The transmission distance may vary depending on the surrounding environment and radio wave conditions.
Different Bluetooth transmission output classes have connection compatibility, but they might be connected using the shorter maximum transmission distance.
For example, if a smartphone that is Class 2 (10 m unobstructed transmission range) is connected to this unit, which is Class 1 (100 m unobstructed transmission range), the unobstructed transmission range of the smartphone will be applied.
|
LINE OUT (UNBALANCED) |
||
|
Connectors |
RCA pin jacks |
|
|
Maximum output level |
+6 dBV |
|
|
Nominal output level |
−10 dBV |
|
|
Output impedance |
100 Ω or less |
|
|
LINE OUT (BALANCED) |
||
|
Connectors |
XLR (balanced) (1: GND, 2: HOT, 3: COLD) |
|
|
Maximum output level |
+14 dBu |
|
|
Nominal output level |
−2 dBu |
|
|
Output impedance |
200 Ω or less |
|
|
Frequency response |
20 Hz – 20 kHz: +0.5 dB / −1 dB |
|
|
Distortion (THD+N) |
0.04% or less |
|
|
S/N |
90 dB or more |
|
|
Channel separation |
100 dB or more |
|
Power |
Specialized AC adapter (PS-M1524) Input voltage: AC 100–240 V (50/60 Hz) Output voltage: DC 15 V Output current: 2.4 A |
|
|
Operating temperature range |
0ºC – 40ºC |
|
|
Operating humidity range |
5% – 85% (without condensation) |
|
|
Power consumption |
1.7 W |
|
|
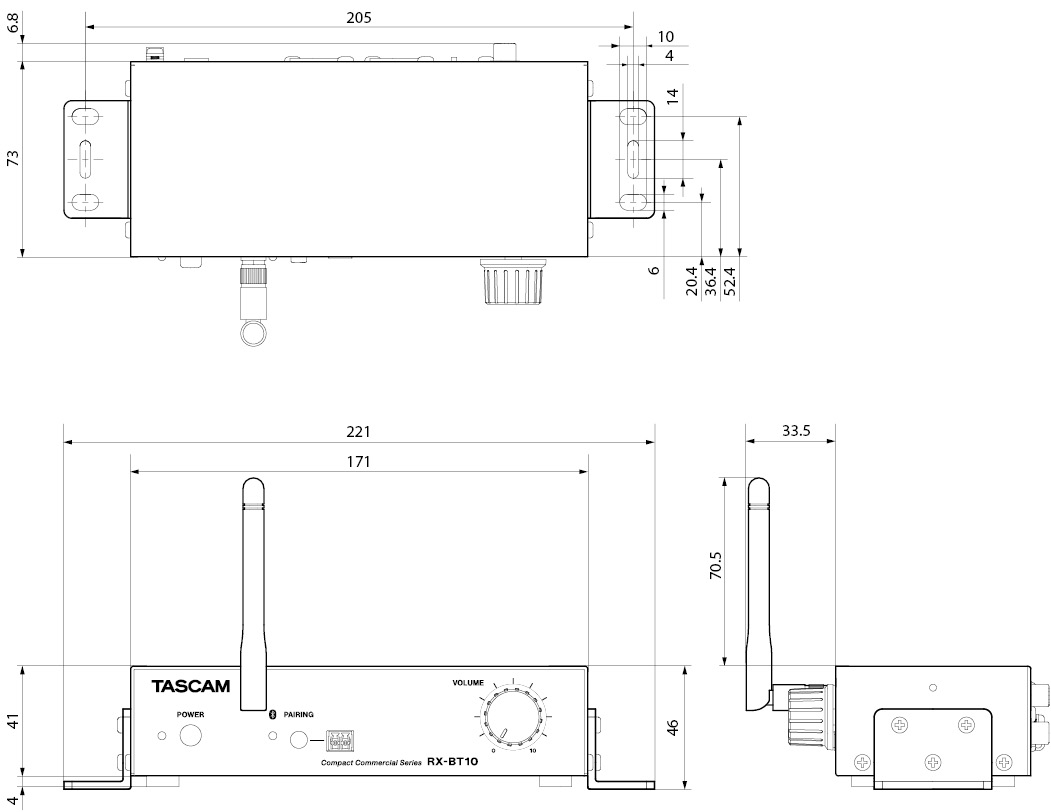
Dimensions |
171 × 45 × 73 millimeters (width × height × depth, excluding protrusions) |
|
|
Weight |
530 g |
0 dBV=1 Vrms, 0 dBu=0.775 Vrms
Illustrations in this manual might differ in part from the actual product.
Specifications and external appearance might be changed without notification to improve the product.
|
1125.MA-4021C |